
Fieldstone Inspection Studio
demo@example.test
Home inspection report
Sep 5, 2026
Sample inspection report
48 Juniper Hollow
Client
Sample client
Inspection date
Sep 5, 2026
Agent
Sample representative
Report status
published
61/77
Items inspected
19
Functional
24
Marginal
16
Defect
2
Safety
ASummary
18 items that deserve attention first
Rainwater routes & ground contact
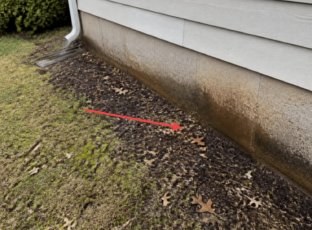
DefectRear wall receives runoff
Rear foundation beside planting bed. Have a qualified contractor establish positive surface drainage without burying cladding or vents. Confirm the completed route during rainfall before installing interior finishes.
Rainwater routes & ground contact
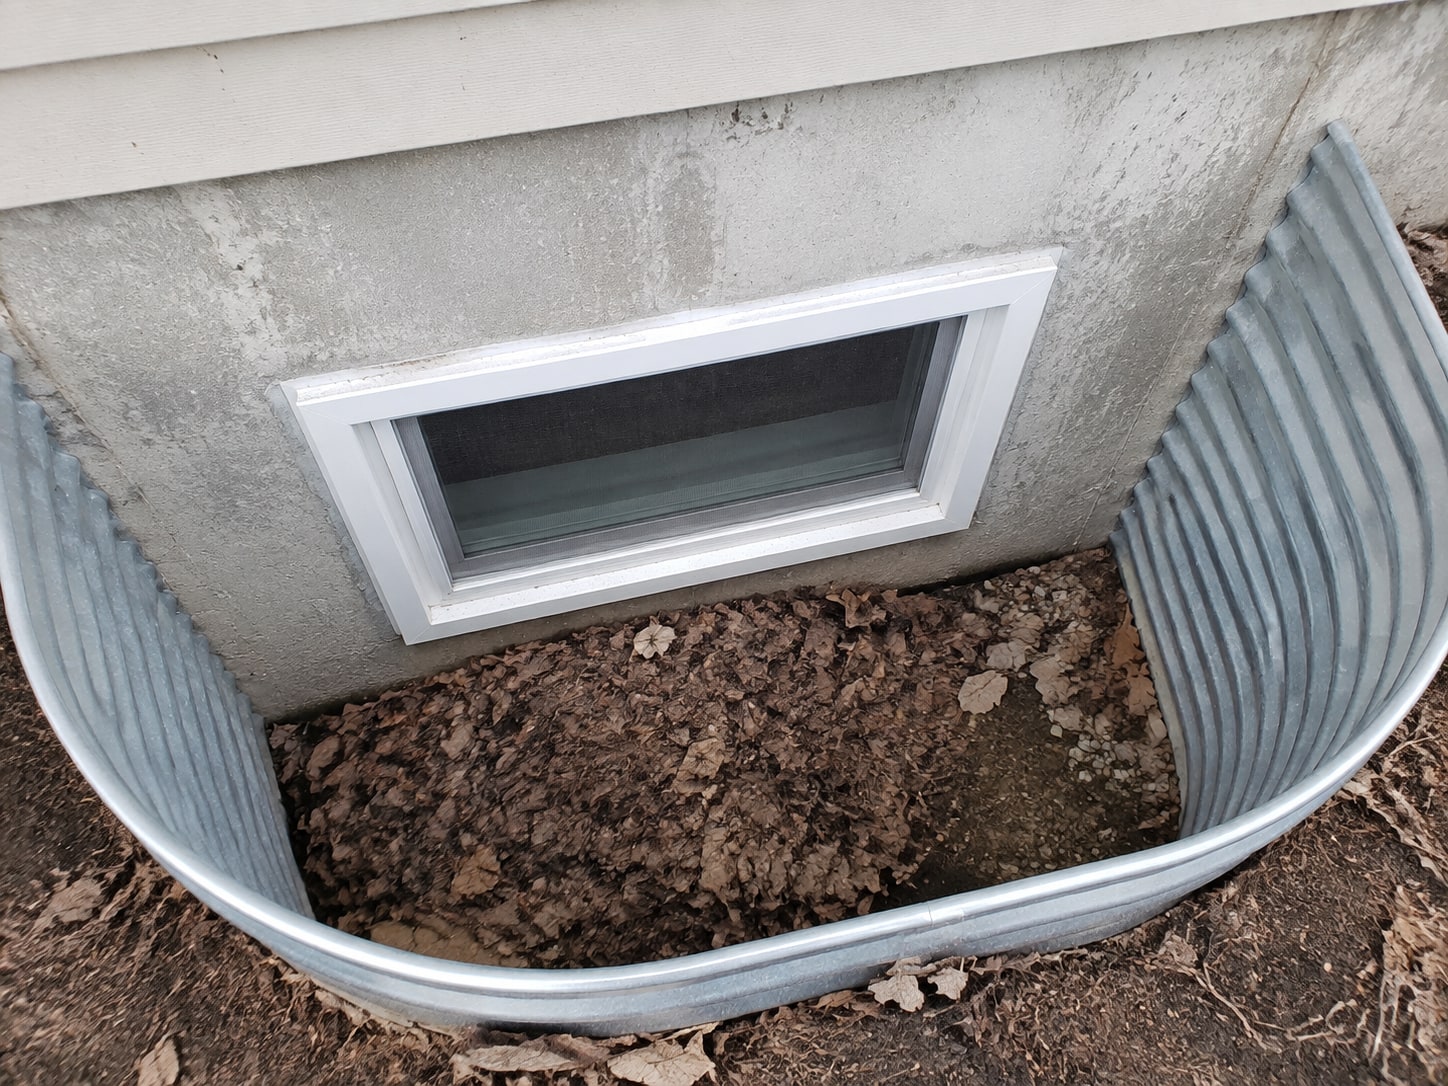
DefectWindow well clearance
Lower-level office window. Remove debris and have the drainage path identified and checked. Do not assume that a visible gravel surface proves a connected drain is functioning.
Roof surfaces & weather seals
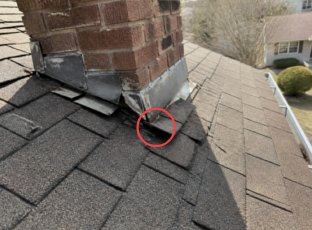
DefectChimney transition is open
Rear roof plane at masonry chimney. Have a qualified roofer inspect and correct the flashing assembly, including concealed transitions as needed. Check the accessible interior below after repair and subsequent rainfall.
Exterior enclosure & openings
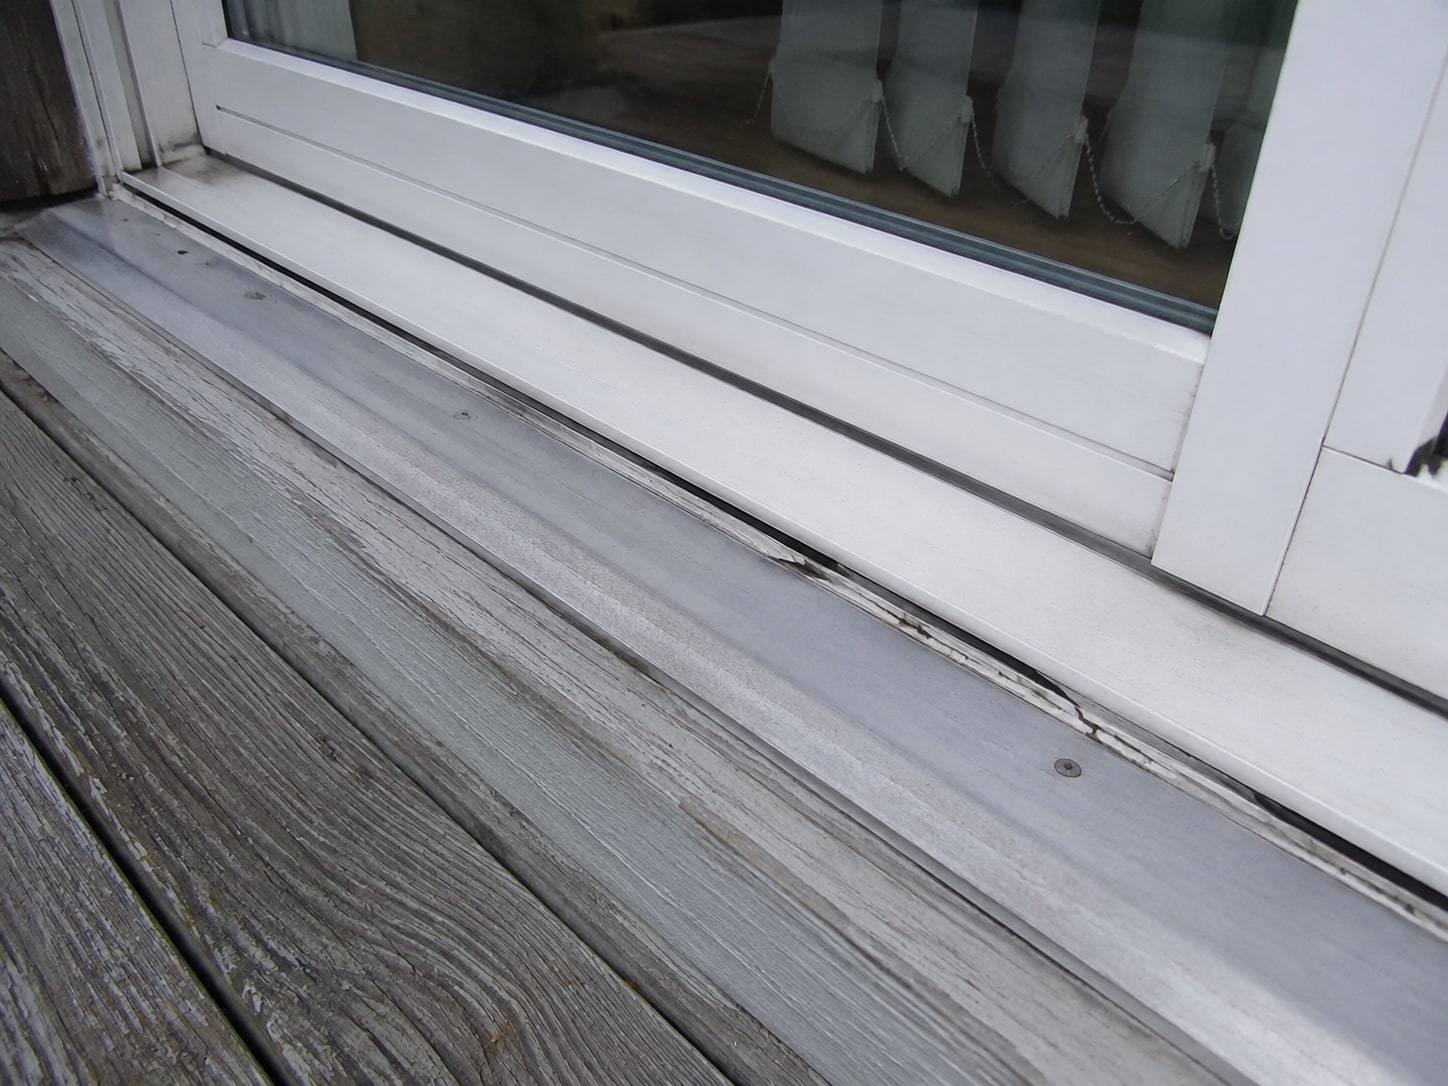
DefectPatio door threshold movement
Breakfast room exterior opening. Have a qualified door installer assess support and weather sealing. Correct the assembly before applying finish sealant.
Foundation & load paths
DefectFloor alteration at utility opening
Basement below laundry. Have a qualified structural professional or appropriately qualified contractor assess the alteration and specify any needed repair.
Electrical service & isolation points
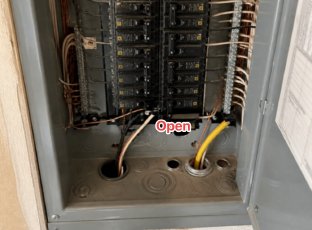
SafetyMain enclosure has an open knockout
Basement service panel. Have a qualified electrician restore the enclosure with a listed closure appropriate to the panel. Avoid contact with the opening until corrected.
Electrical service & isolation points
DefectGarage panel access obstructed
Garage east wall. Relocate storage and have required access clearances checked for the installed equipment.
Branch circuits & occupant protection
DefectExterior receptacle cover damaged
Rear patio outlet. Have a qualified electrician provide a suitable cover and inspect the device and enclosure for moisture effects.
Climate system A — main floor
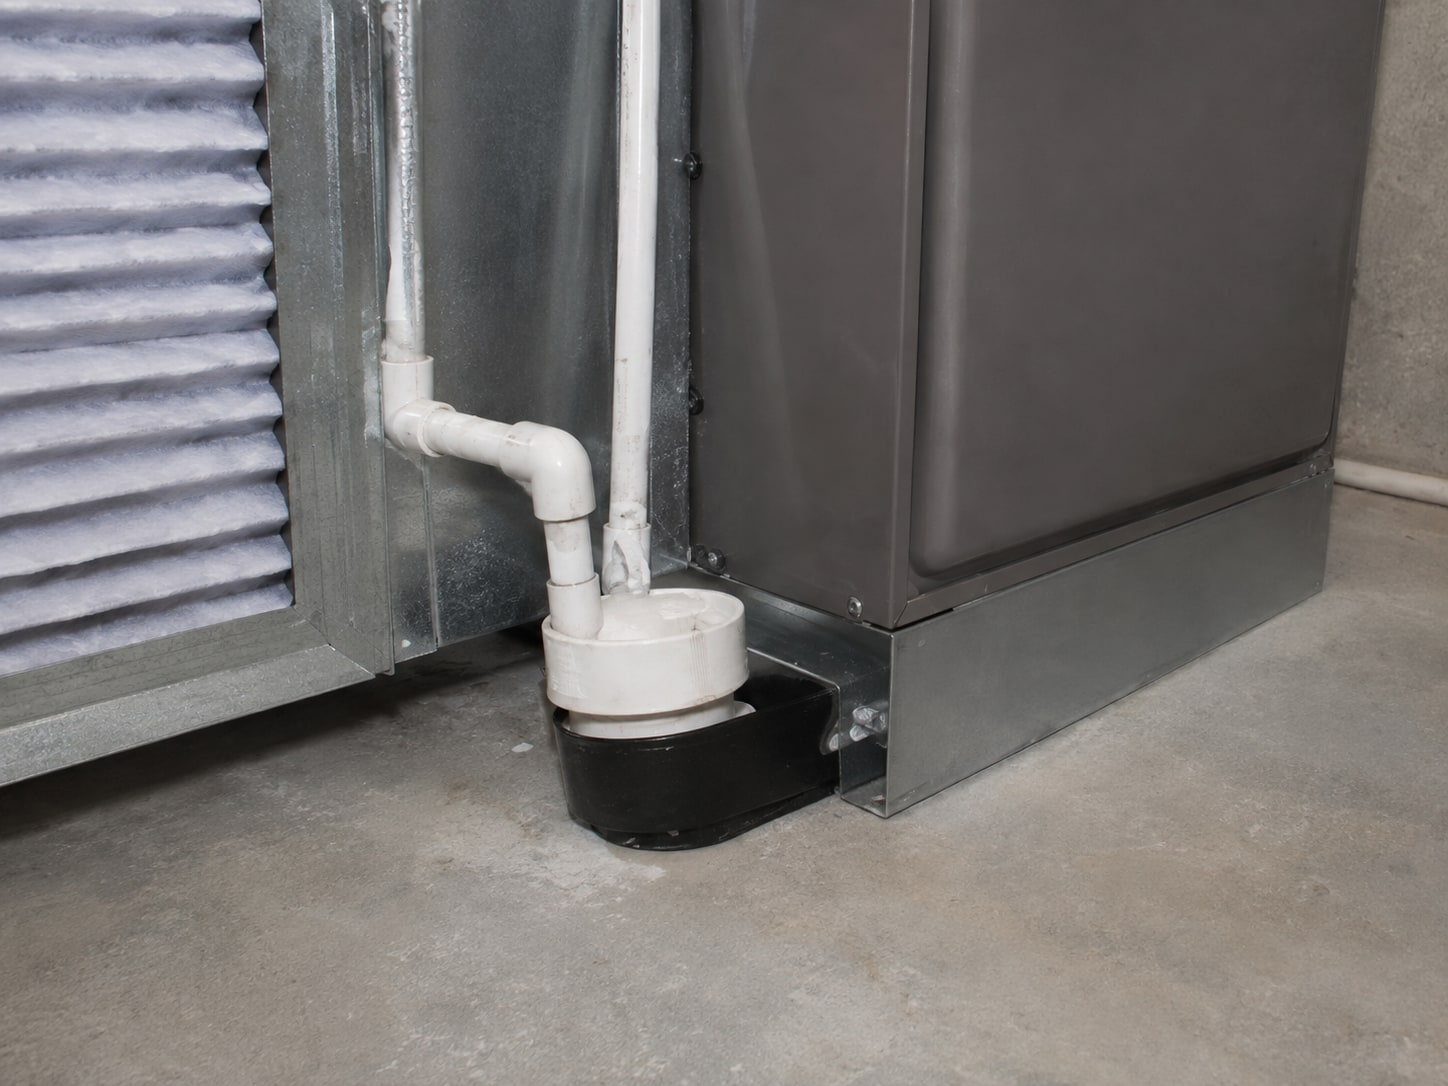
DefectCondensate line connection loose
System A cabinet drain. Have an HVAC technician correct the drain connection and verify drainage during operation. Check affected materials after the leak source is addressed.
Climate system B — upper floor
DefectAuxiliary pan contains staining
Below upper-floor air handler. Have an HVAC technician assess primary drainage and overflow protection, clean the pan and verify operation after correction.
Water supply & hot-water plant
DefectSupply support at repair transition
Basement ceiling near laundry. Have a qualified plumber secure the assembly and inspect the transition for stress or leakage.
Fixture groups & drainage
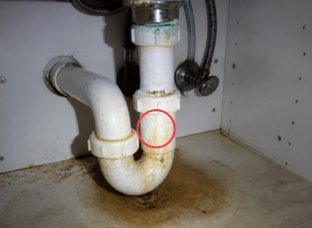
DefectKitchen trap leakage evidence
Kitchen sink base cabinet. Have a qualified plumber correct the connection and verify it under fixture use. Check that affected cabinet materials are dry before refinishing.
Fixture groups & drainage
DefectMain-floor toilet movement
Guest bathroom. Have a plumber correct the attachment and evaluate the seal and supporting materials.
Rooms, stairs & interior openings
SafetyBasement handrail loose
Lower stair flight. Have a qualified contractor restore a secure attachment before relying on it for support.
Kitchen & laundry equipment
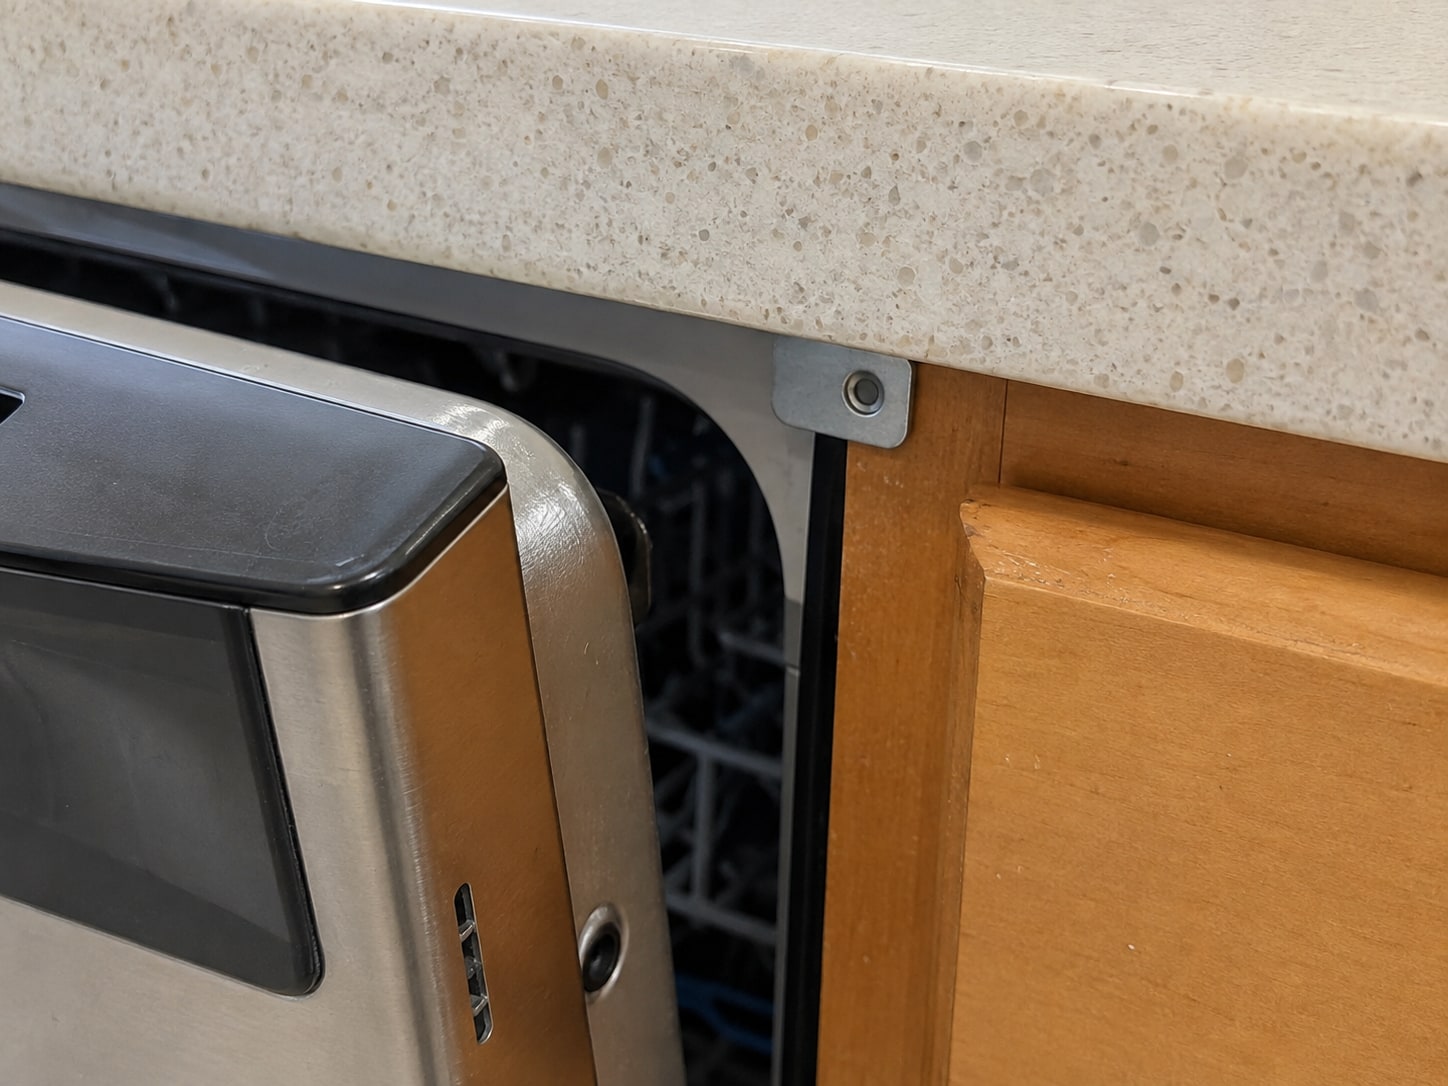
DefectDishwasher attachment movement
Kitchen dishwasher. Have a qualified installer secure the appliance and check connected services for strain.
Roof-space access & thermal boundary
DefectBathroom duct ends short of outlet
Accessible attic above shared bathroom. Have a qualified contractor reconnect and support the exhaust route and examine adjacent materials for moisture effects.
Garage, storage & outbuildings
DefectHouse door does not close reliably
Garage-to-utility-room opening. Have a qualified contractor evaluate the door assembly and restore reliable closure and latching.
Garage, storage & outbuildings
DefectStorage shed threshold decay
Detached shed entrance. Have a qualified contractor determine the extent of deterioration and restore safe entrance support.
BInspection details
01Property context & inspection record
3 of 4 items inspected
System record
- Property type
- Two-story detached residence
- Approximate construction year
- 2004
- Floor area
- 3,420 square feet (demonstration value)
- Occupancy
- Furnished; occupants absent
- Weather
- Dry, light wind; 76 °F
- Utilities
- Water, gas and electricity operating
Scope and limitations
What this review covers
This is an original demonstration of InspectorKit's reporting capabilities. The property, measurements, people and inspection observations are fictional. Photo records accompany the corresponding observations and system descriptions.
Care and next steps
Planning for ownership
Read the priority summary together with the complete system records. A condition rating describes the recorded observation, not every concealed part of a system. For a real purchase, an inspector would tailor the inspection agreement, exclusions and recommendations to the property and engagement.
Property context & inspection record
Inspection coverage
Location: Whole property
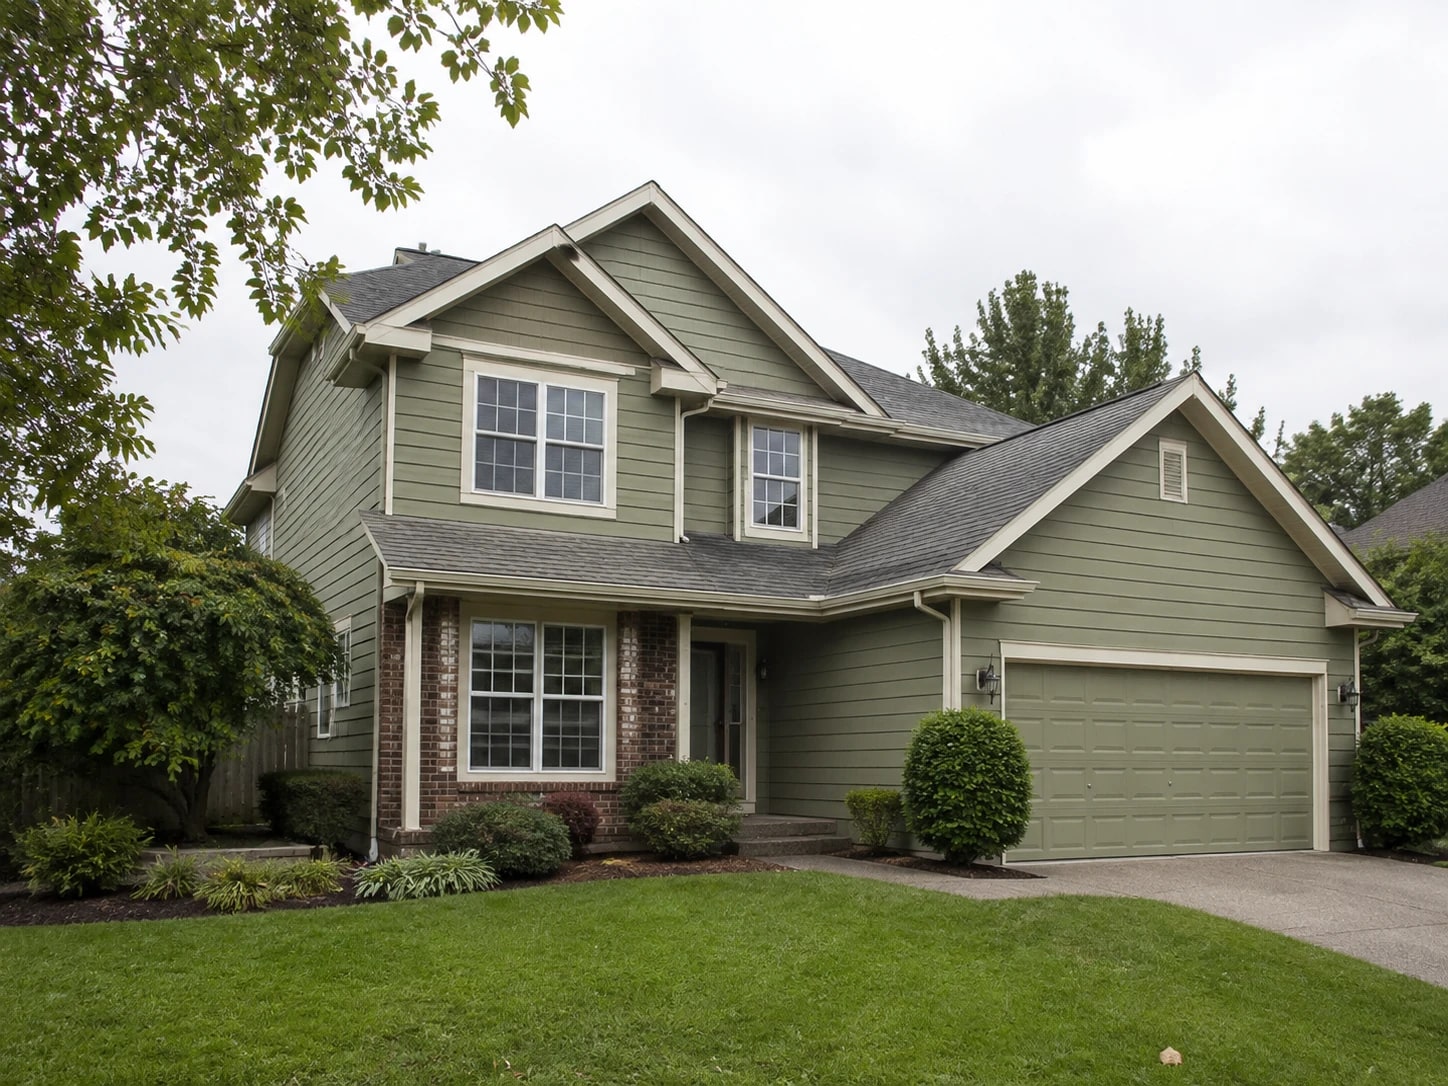
The demonstration scope includes the main residence, attached garage, accessible exterior and two independently controlled heating and cooling systems. A detached storage shed is recorded separately so its limited scope cannot be mistaken for the house inspection.
Next step: Property identifiers, client details and operating conditions should be confirmed before issuing a live report.
Property context & inspection record
Access register
Location: Storage room and concealed cavities
Stored boxes restricted two garage wall areas. Finished basement ceilings concealed most floor framing. The attic was viewed from the service walkway because insulation concealed joist locations beyond it.
Next step: The location-specific limitations recur in the relevant system records. A restricted area has not been assigned a functional rating.
Property context & inspection record
Documents available
Location: Property records
An equipment service invoice was available for the main-floor furnace; installation paperwork for the upper-floor system was not supplied. Permit history and seller representations were not verified.
Next step: Request installation and service records for both systems. Record review is a separate activity from a visual condition inspection.
Property context & inspection record
Operating conditions
Location: Inspection session
Water fixtures, accessible lighting and normal equipment controls were available for the demonstration. The irrigation controller remained isolated; no irrigation performance is represented.
Next step: Identify any change in utility status between inspection and possession before relying on an earlier operational check.
02Rainwater routes & ground contact
4 of 5 items inspected
System record
- Site profile
- Rear yard rises toward the house
- Ground drainage
- Surface runoff and roof downspouts
- Foundation exposure
- Concrete perimeter wall
- Roof drainage
- Aluminum gutters; four outlets
- Below-grade drain
- Not visible
- Test method
- Visual review from accessible ground
Scope and limitations
What this review covers
Surface drainage was considered as a connected route from roof to ground to discharge point. Buried piping and drainage performance during storms were not established. Dry weather can conceal intermittent ponding or seepage.
Care and next steps
Planning for ownership
Walk the exterior during the first substantial rainfall after possession and record where water collects. Keep accessible outlets clear and have unresolved inward drainage assessed before covering moisture-sensitive materials.
Rainwater routes & ground contact
Rear wall receives runoff
Location: Rear foundation beside planting bed
The finished soil surface falls toward the wall at the rear planting bed. Staining is visible along the lower wall face. This route can keep the foundation wet even when the roof covering performs as intended.
Next step: Have a qualified contractor establish positive surface drainage without burying cladding or vents. Confirm the completed route during rainfall before installing interior finishes.
Rainwater routes & ground contact
East downspout outlet
Location: East elevation near patio
The outlet extension ends at the edge of the patio and directs discharge onto a walking surface. The extension is not securely retained and can be displaced by routine yard work.
Next step: Provide a stable discharge route that does not create a walking hazard or return water toward the wall.
Rainwater routes & ground contact
Window well clearance
Location: Lower-level office window
Leaves and loose soil cover the bottom of the window well. The drain opening could not be located. Water entering this well may accumulate against the window assembly.
Next step: Remove debris and have the drainage path identified and checked. Do not assume that a visible gravel surface proves a connected drain is functioning.
Rainwater routes & ground contact
Front approach slope
Location: Front walk and entrance
The accessible approach slopes away from the door threshold. No localized settlement was represented at the entrance landing, and adjacent planting beds remained below the siding termination.
Next step: Keep the drainage gap open when landscaping or resurfacing the approach.
Rainwater routes & ground contact
Buried drain destination
Location: West downspout connection
One downspout enters a buried pipe. The pipe's destination and internal condition are outside the visible inspection area; no flow or camera test was performed.
Next step: Ask for installation information and investigate if the connection backs up or discharges at the foundation during rain.
Rainwater routes & ground contact
Photo record
1 / 1 · 4 photos
Rear foundation and adjacent ground surface.
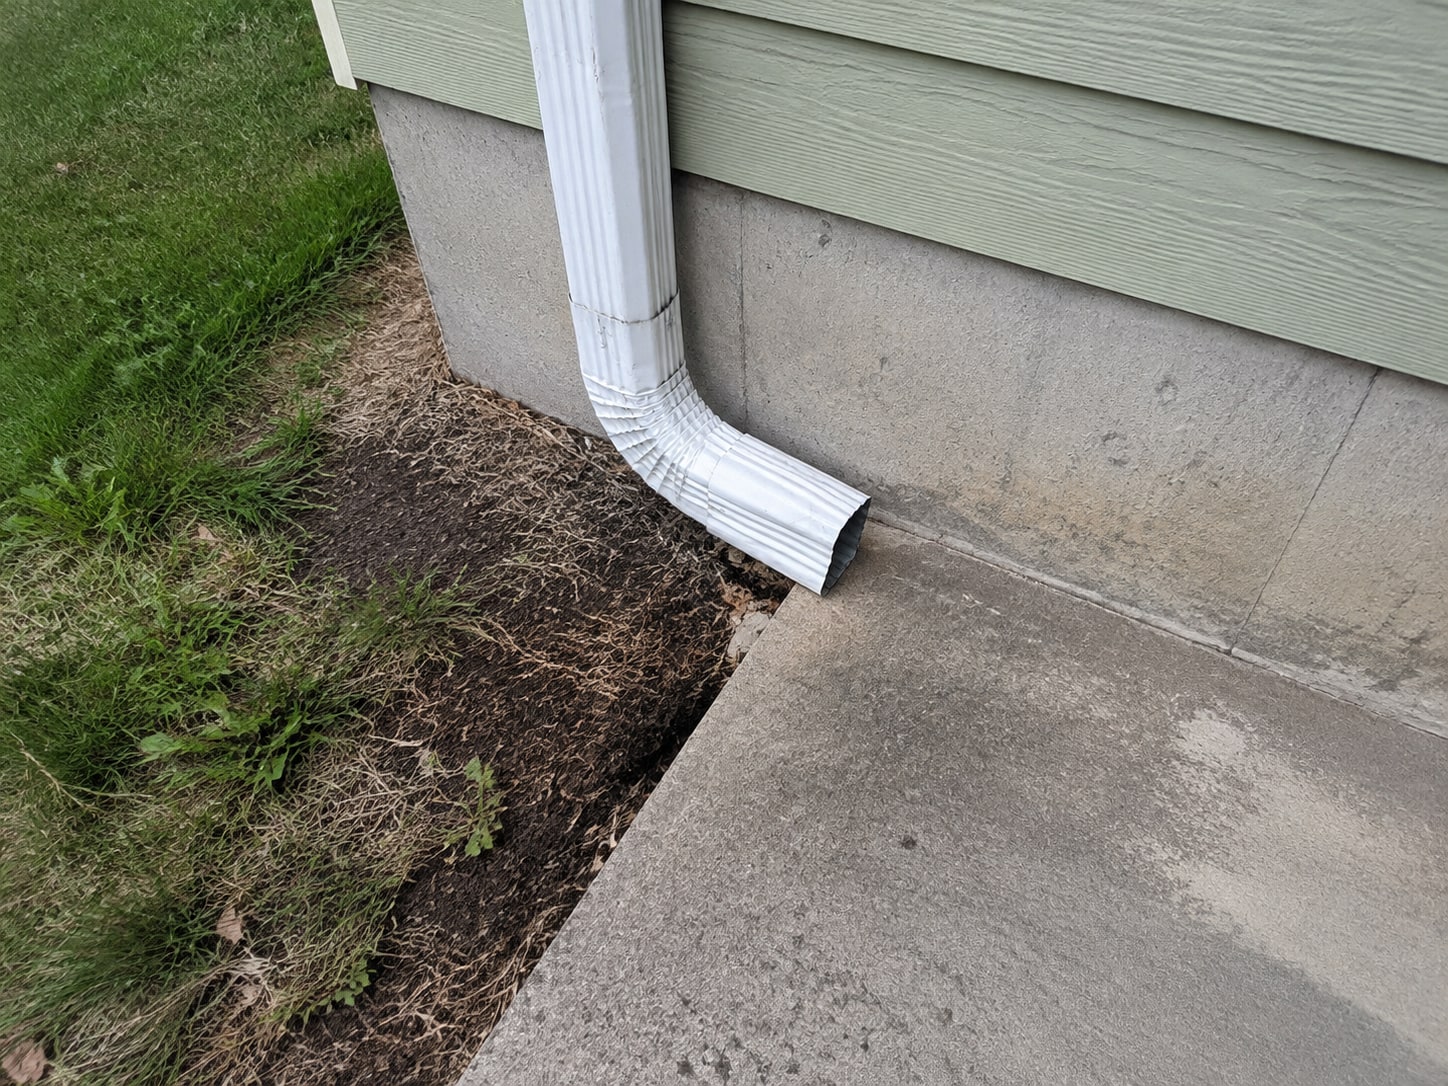
East outlet discharges at the edge of the paving beside the foundation.
Leaves and soil obscure the base of the lower-level window well.
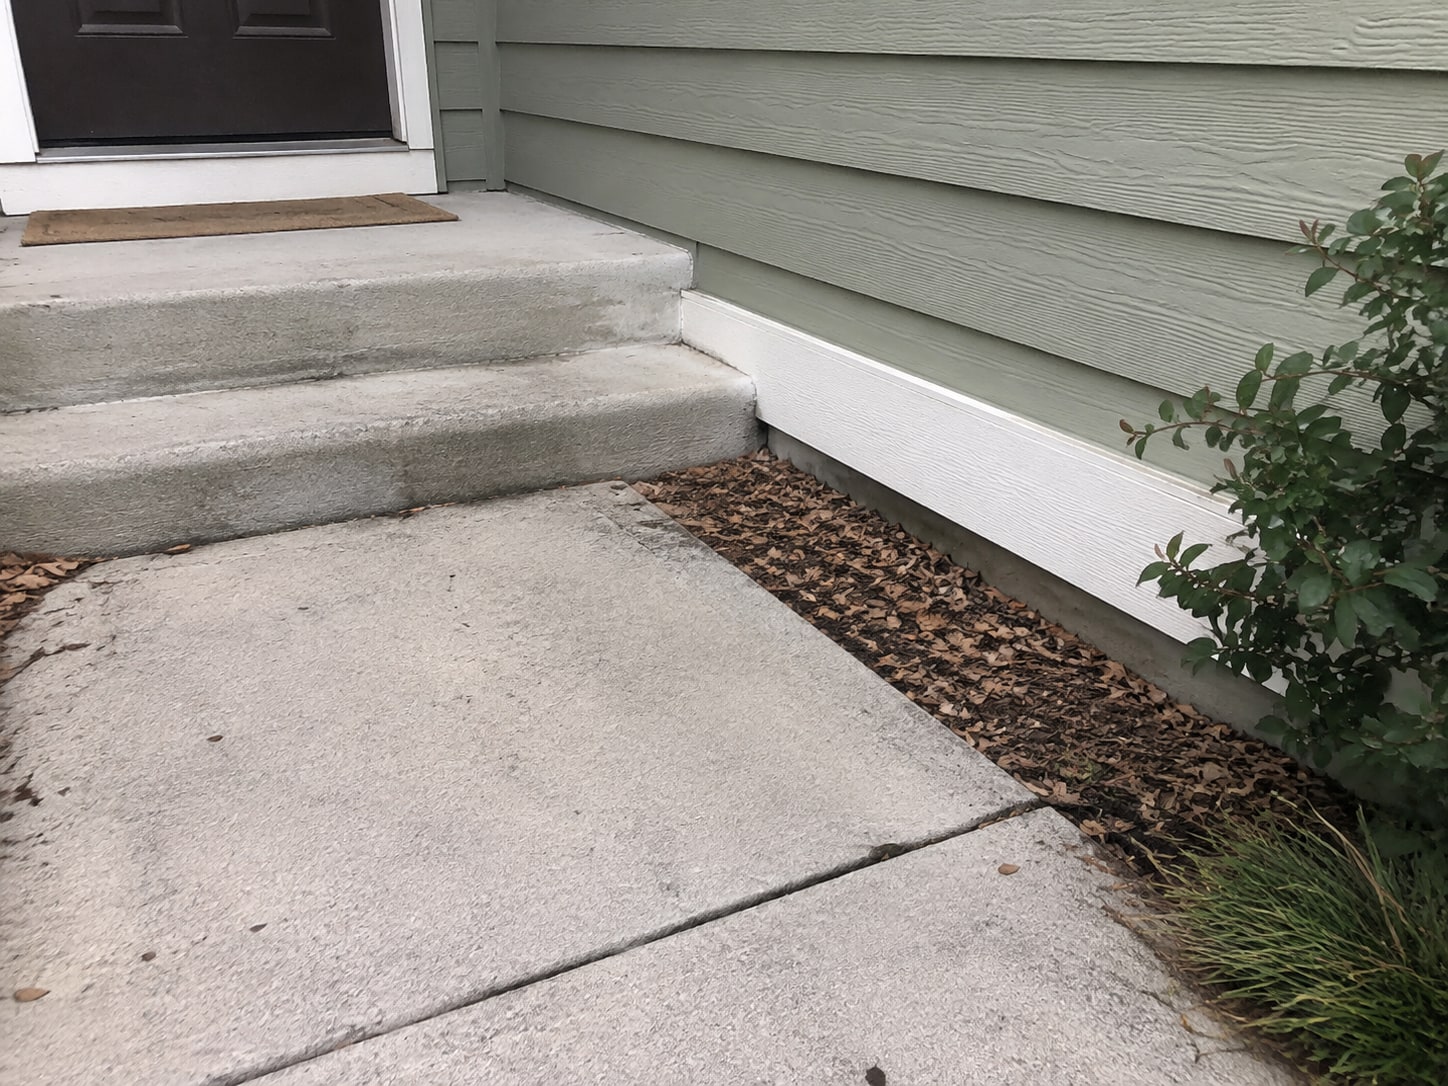
Front landing, approach joint and adjacent ground surface.
03Roof surfaces & weather seals
4 of 5 items inspected
System record
- Covering
- Architectural asphalt shingles
- Roof form
- Intersecting pitched planes
- Observation method
- Ground, eaves and accessible attic
- Penetrations
- Masonry chimney; plumbing vents
- Drainage detail
- Open eaves with gutters
- Known covering age
- Not documented
Scope and limitations
What this review covers
The covering was reviewed from accessible vantage points. Concealed underlayment, fasteners below the covering and the full roof-to-wall interfaces were not exposed. A dry-weather visual review cannot demonstrate that every roof joint is watertight.
Care and next steps
Planning for ownership
Use a roofing professional for elevated access, repairs and maintenance. Keep a record of repairs by location so future staining can be compared with the roof details above it rather than treated as an unrelated cosmetic issue.
Roof surfaces & weather seals
Chimney transition is open
Location: Rear roof plane at masonry chimney
The photographs show lifted metal at the chimney-to-roof transition and an open edge at the counterflashing. A sealant-only patch would not establish that the concealed step-flashing sequence is intact.
Next step: Have a qualified roofer inspect and correct the flashing assembly, including concealed transitions as needed. Check the accessible interior below after repair and subsequent rainfall.
Roof surfaces & weather seals
Covering wear differs by slope
Location: South-facing roof plane
Granule loss and surface aging are more pronounced on the sun-exposed plane than on the shaded side. No remaining-life estimate is assigned from appearance alone.
Next step: Obtain the covering's installation date and repair history; have a roofer evaluate localized deterioration when addressing the chimney flashing.
Roof surfaces & weather seals
Valley debris accumulation
Location: Roof intersection above breakfast room
Leaves have collected near the lower valley outlet. The surrounding surface was visible, but the concealed edge beneath the accumulated debris was not examined.
Next step: Arrange safe cleaning and a follow-up look at the uncovered material. Recheck during seasonal leaf fall.
Roof surfaces & weather seals
Vent boot condition
Location: Visible plumbing vent penetrations
The visible collars appear seated around the vent pipes without an obvious split at the accessible viewing distance. This observation does not establish the condition of the underside of each boot.
Next step: Include the boots in routine roof maintenance, particularly after nearby roof work.
Roof surfaces & weather seals
Eave access restriction
Location: High north eave
The upper eave was screened by trees from ground level and could not be examined closely. The inspection record identifies this restricted area rather than extending observations from the opposite side.
Next step: Arrange a closer examination if records, interior staining or future symptoms suggest a concern in this area.
Roof surfaces & weather seals
Photo record
1 / 1 · 6 photos
Chimney flashing transition; open edge marked.
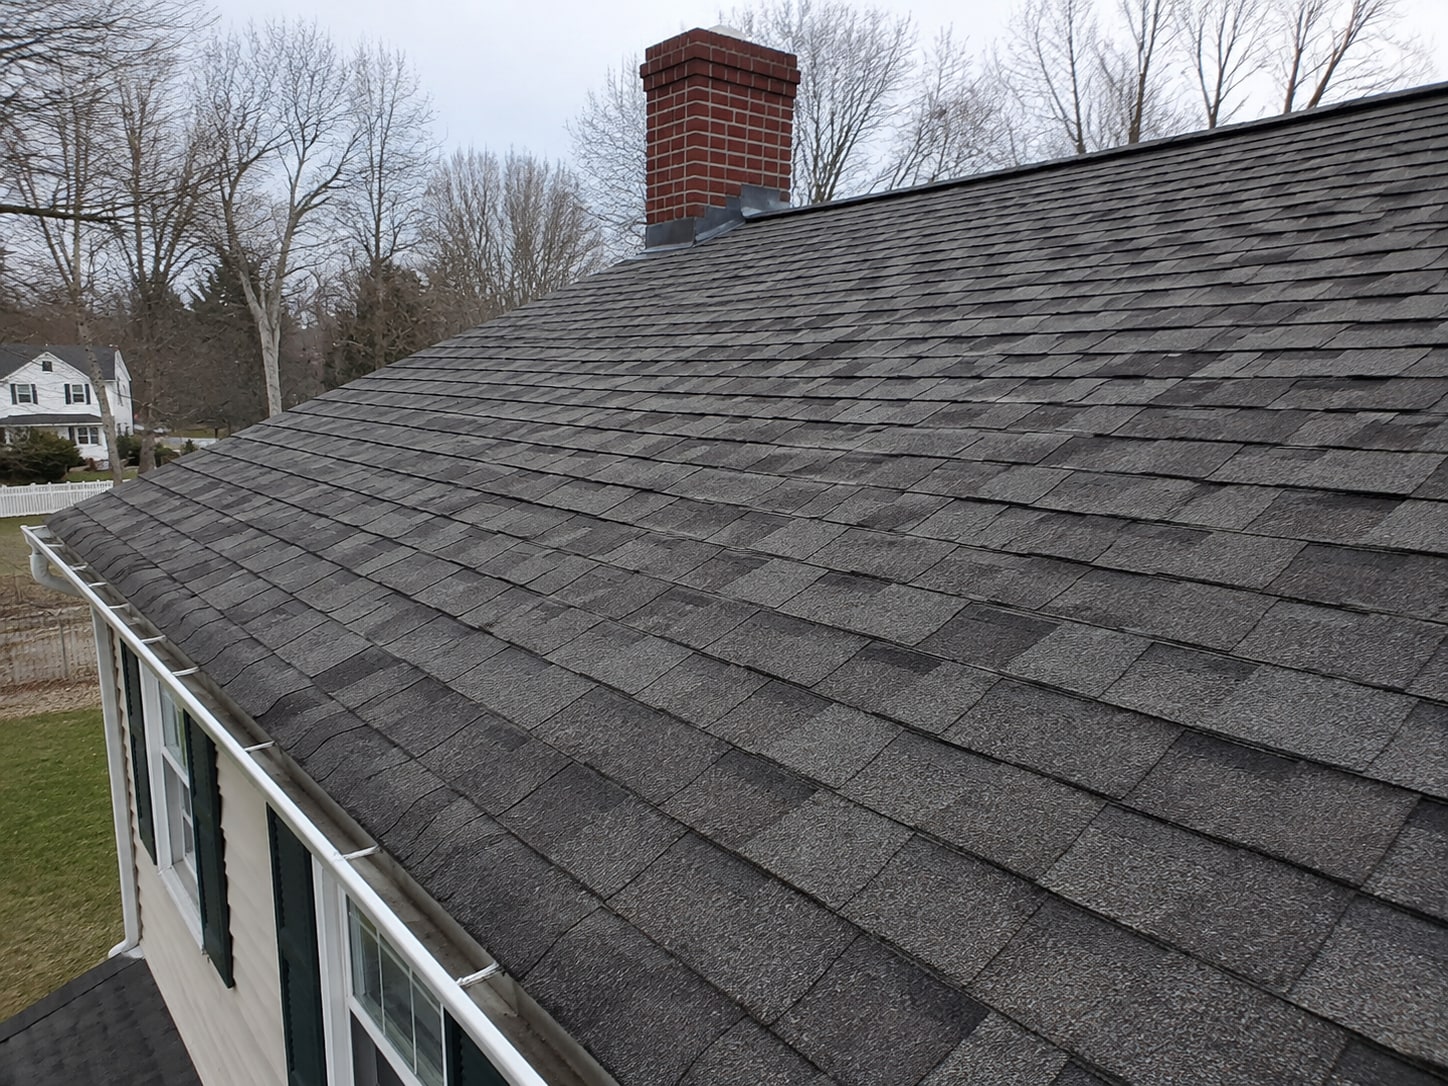
Overview of the visible covering and chimney location.
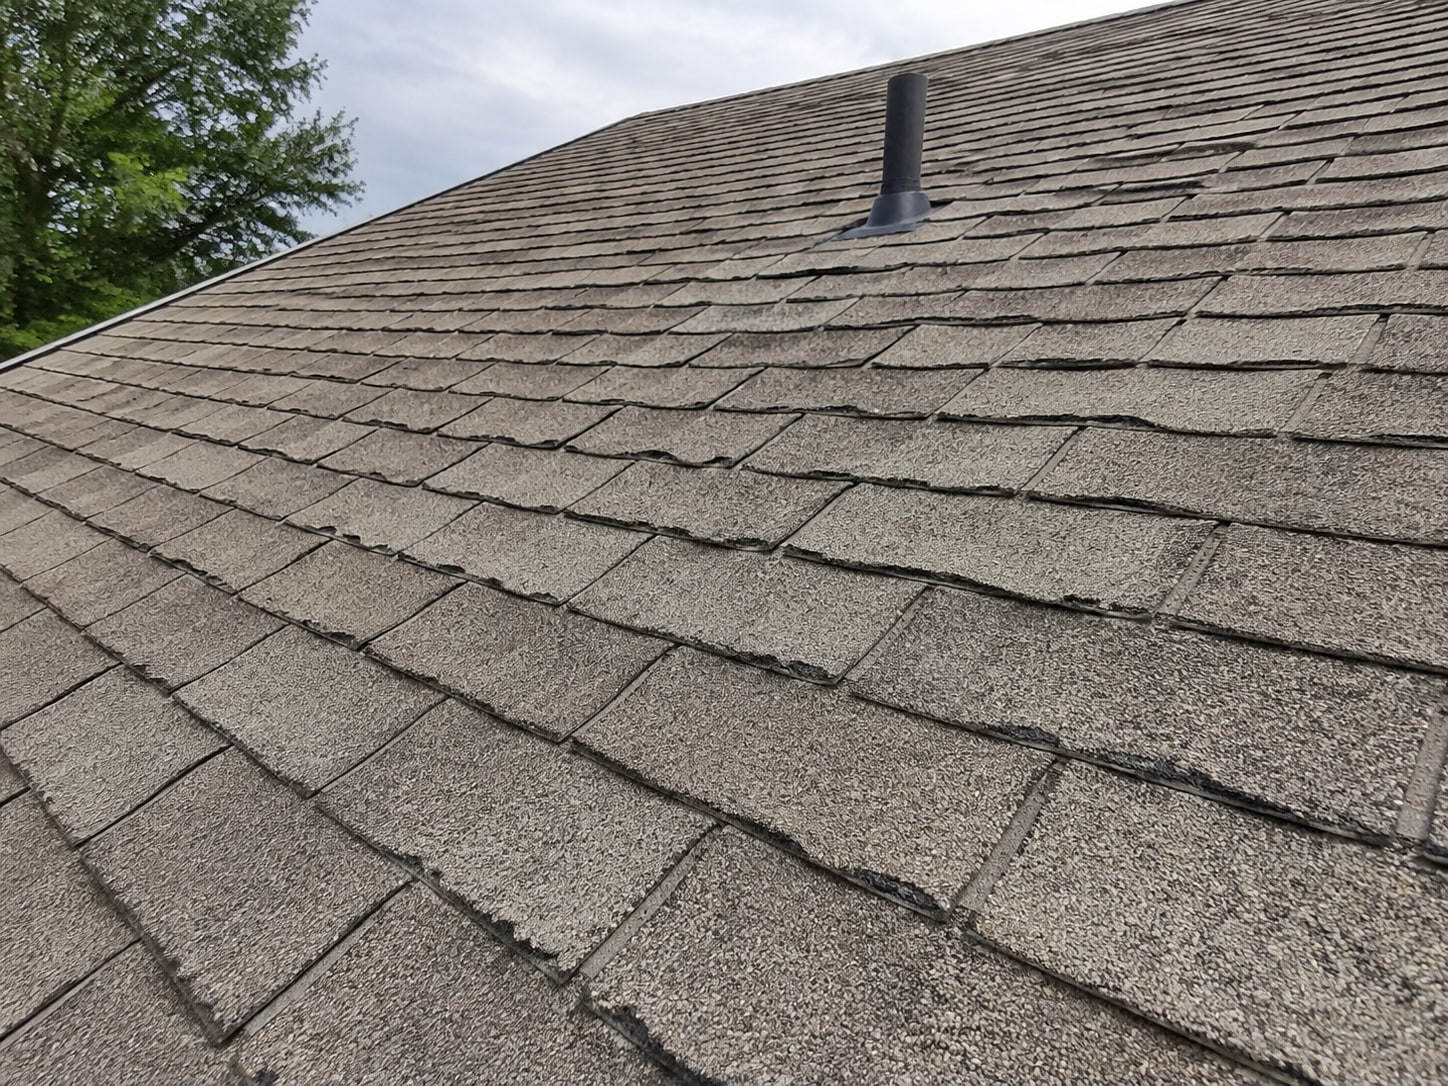
Closer view of the exposed shingle surface.
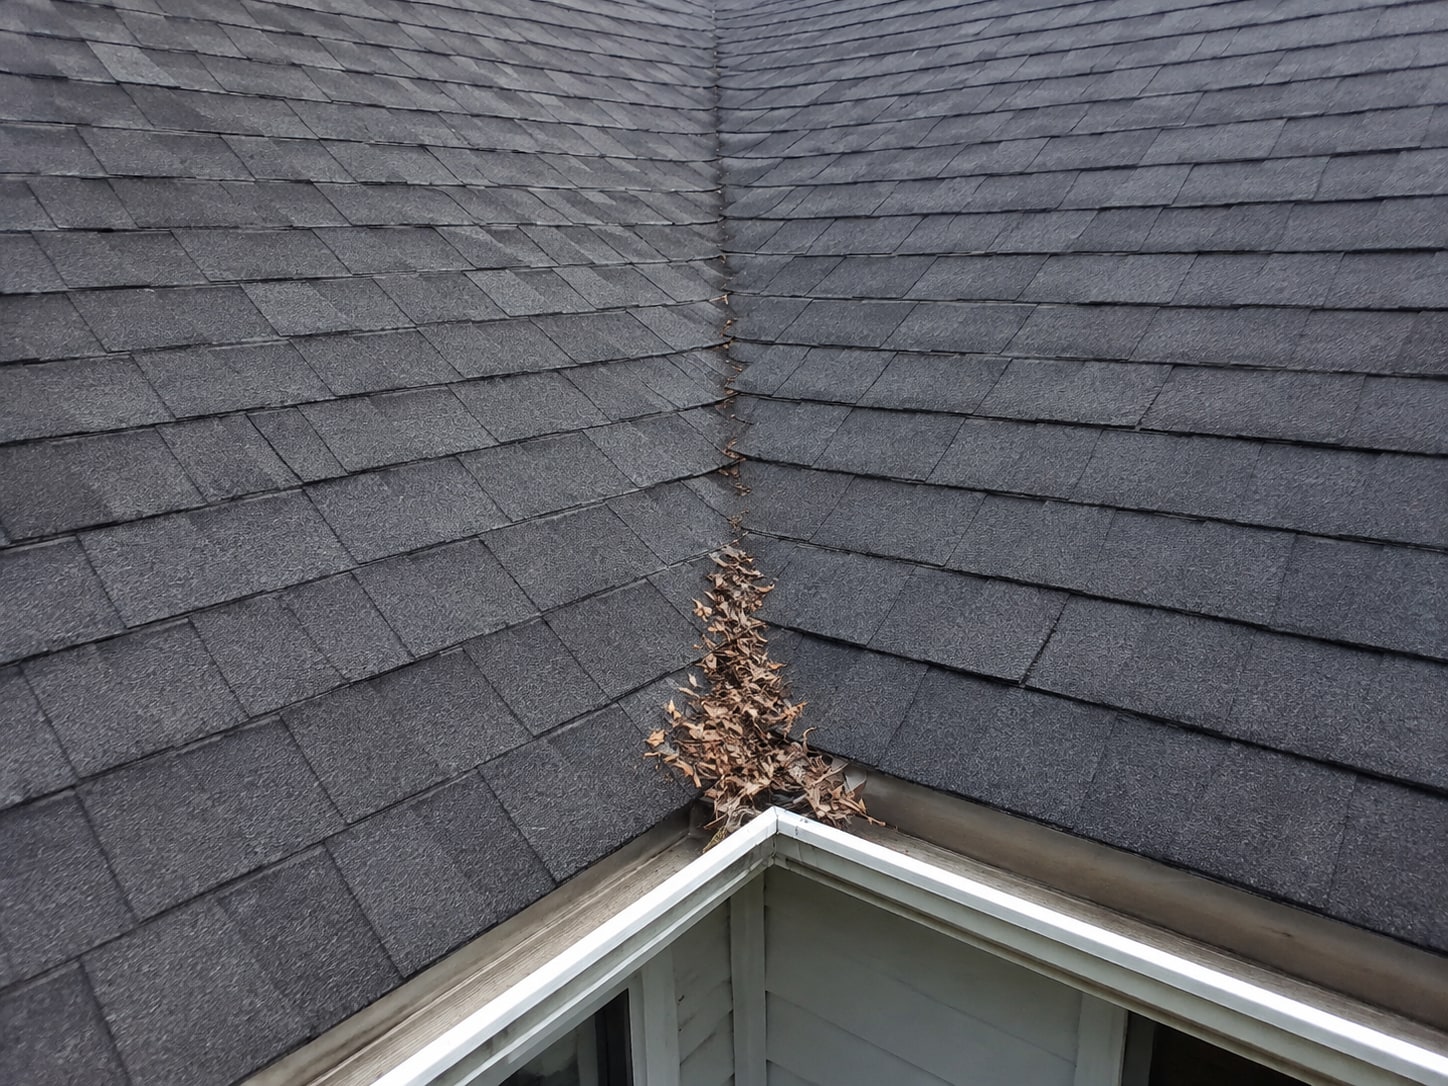
Leaf debris collected along the roof valley.
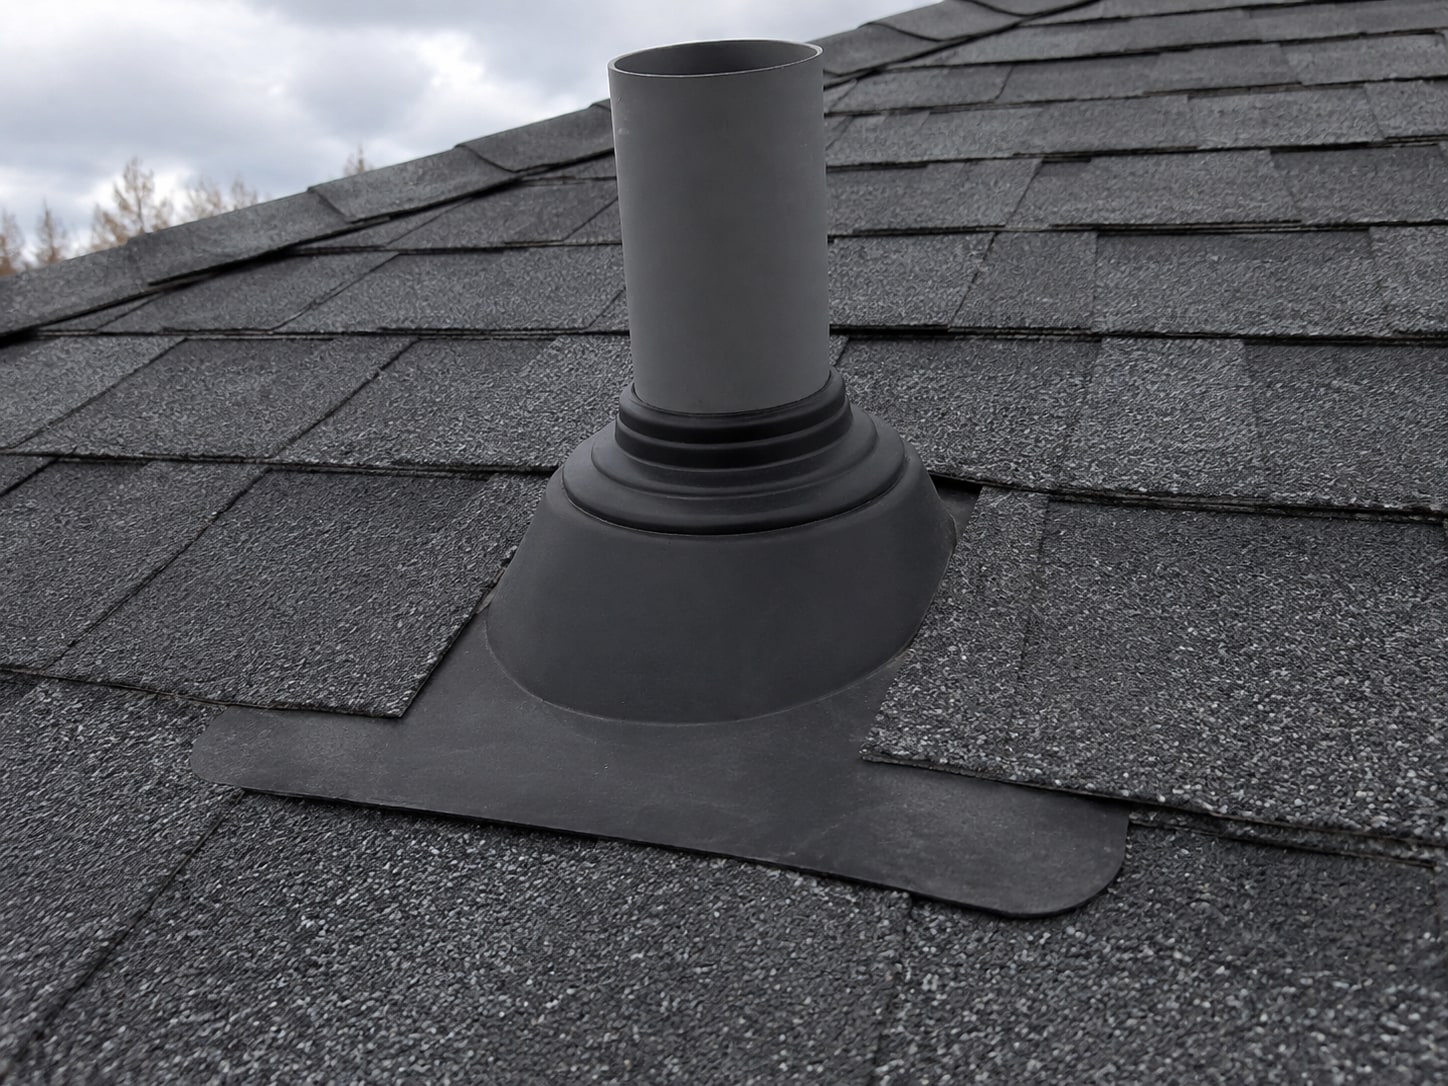
Visible plumbing-vent boot and surrounding shingles.
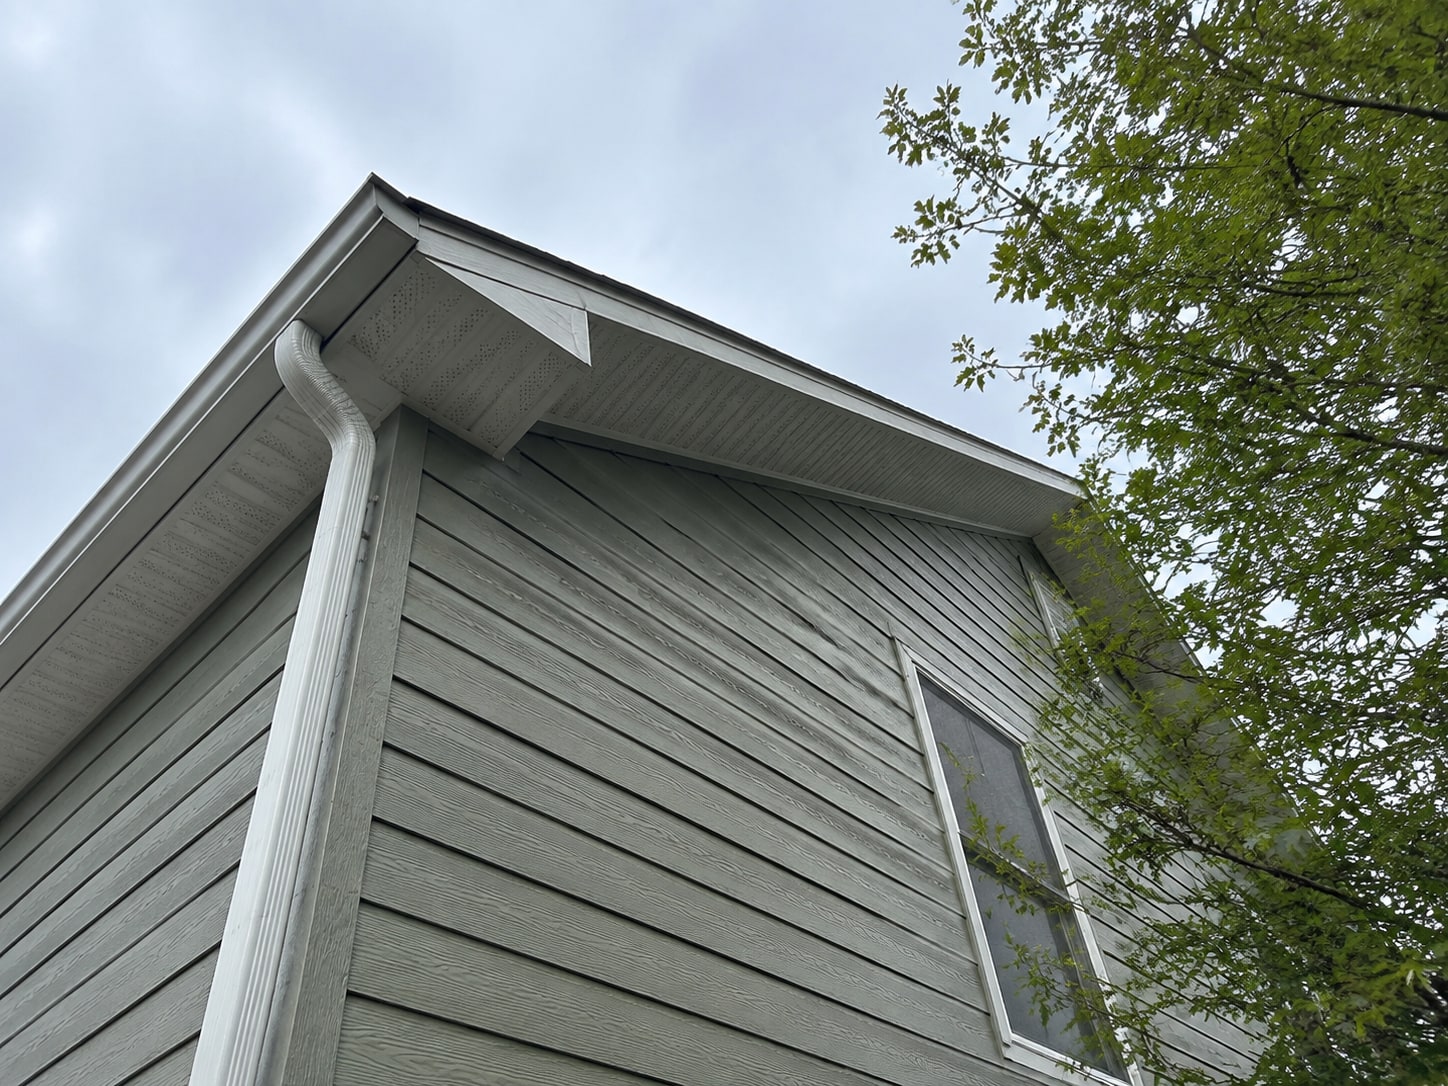
Eave, gutter and adjacent roof edge viewed from the perimeter.
04Exterior enclosure & openings
4 of 5 items inspected
System record
- Wall finish
- Fiber-cement lap siding with masonry accent
- Trim
- Painted composite and wood
- Windows
- Insulated glazing
- Exterior doors
- Three hinged doors; one patio slider
- Attachment
- Rear elevated landing
- Inspection approach
- Accessible perimeter walk
Scope and limitations
What this review covers
The exterior review considered visible surfaces and accessible openings. Waterproofing behind siding, concealed flashing and wall insulation could not be seen. Vegetation and elevated surfaces reduced close access in identified areas.
Care and next steps
Planning for ownership
Water control depends on connected layers. Surface sealant, flashing, cladding clearance and drainage openings should work together; sealing every gap indiscriminately can close an intended drainage path.
Exterior enclosure & openings
Low siding clearance
Location: West planting strip
Soil and mulch are close to the lower cladding edge at the west elevation. The reduced separation can prolong wetting and conceal the lower trim condition.
Next step: Reduce the buildup and have the exposed lower edge examined. Maintain the manufacturer's required clearance for the installed material.
Exterior enclosure & openings
Patio door threshold movement
Location: Breakfast room exterior opening
The threshold flexes when stepped on near its outer edge. The adjacent sealant is separated. The underlying support was concealed, so the cause of the movement was not established.
Next step: Have a qualified door installer assess support and weather sealing. Correct the assembly before applying finish sealant.
Exterior enclosure & openings
Window perimeter joints
Location: Upper south windows
Several exposed trim joints have small sealant separations. Interior finishes below these windows show no visible staining.
Next step: Maintain the joints using products appropriate to the assembly while preserving drainage openings.
Exterior enclosure & openings
Masonry weep openings
Location: Front accent wall
Visible drainage openings at the masonry base are present and clear of mulch. No claim is made about cavity flashing concealed behind the masonry.
Next step: Keep these openings clear during painting, landscaping and pest-control work.
Exterior enclosure & openings
Landing connection concealed
Location: Rear elevated landing
Finish boards obscure the ledger connection to the house. The review did not establish fastener type, spacing or concealed flashing behind that connection.
Next step: Have the connection evaluated by a qualified contractor if supporting documentation is unavailable or movement develops.
Exterior enclosure & openings
Photo record
1 / 1 · 4 photos
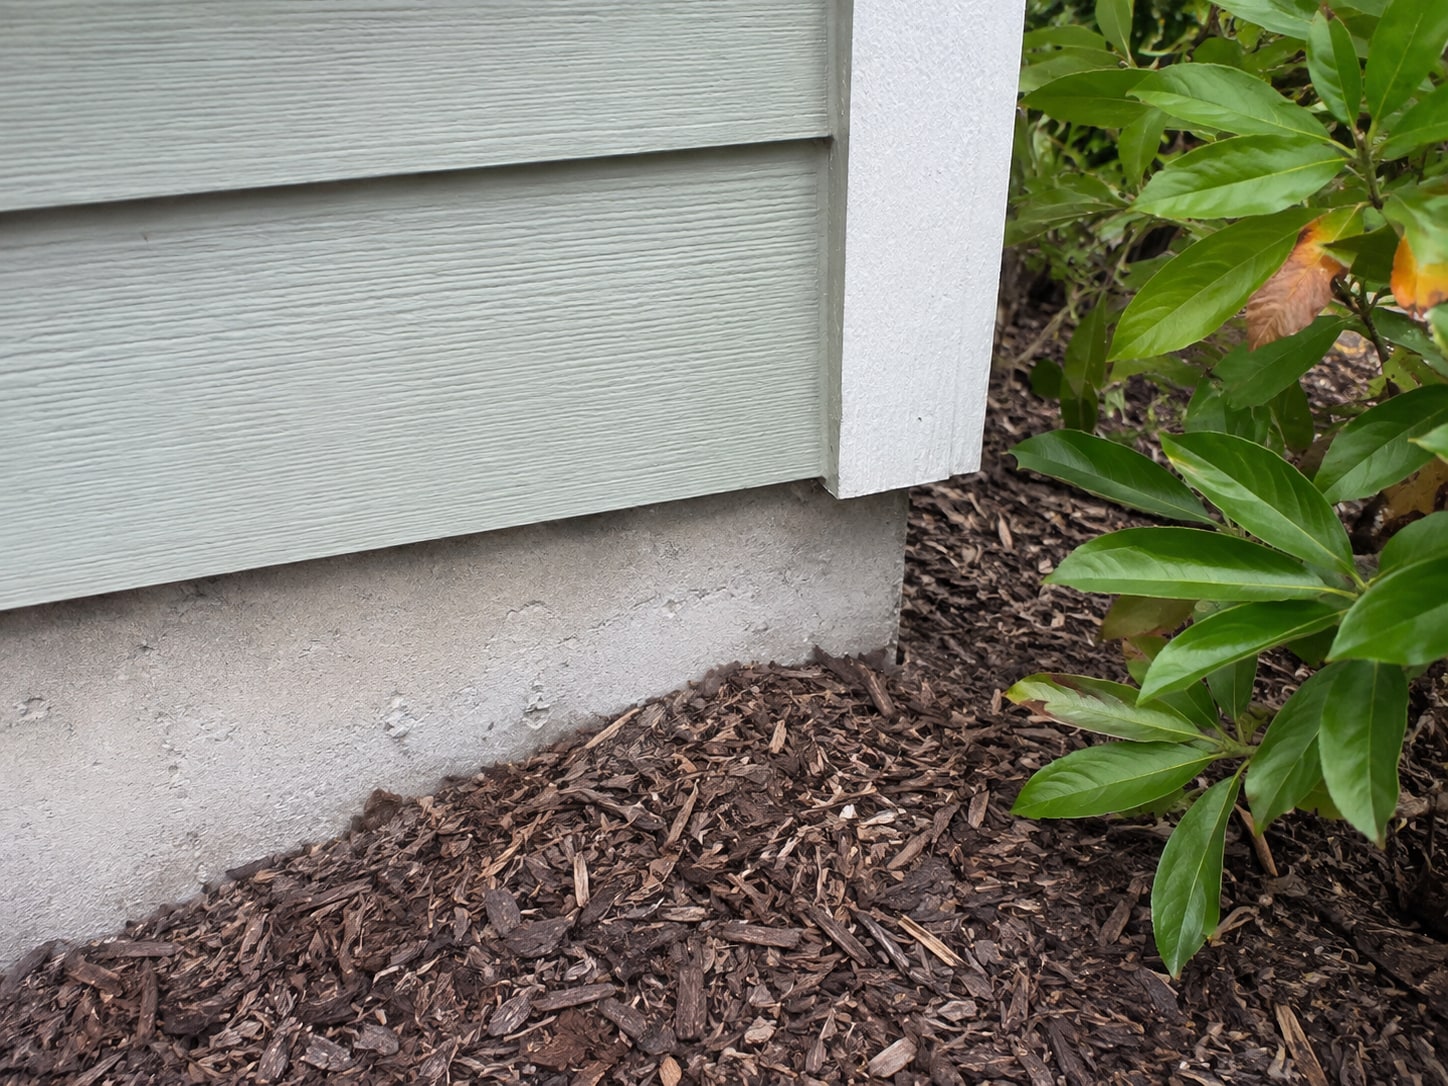
Lower cladding edge above the mulched planting bed.
Patio slider threshold and separated sealant joint.
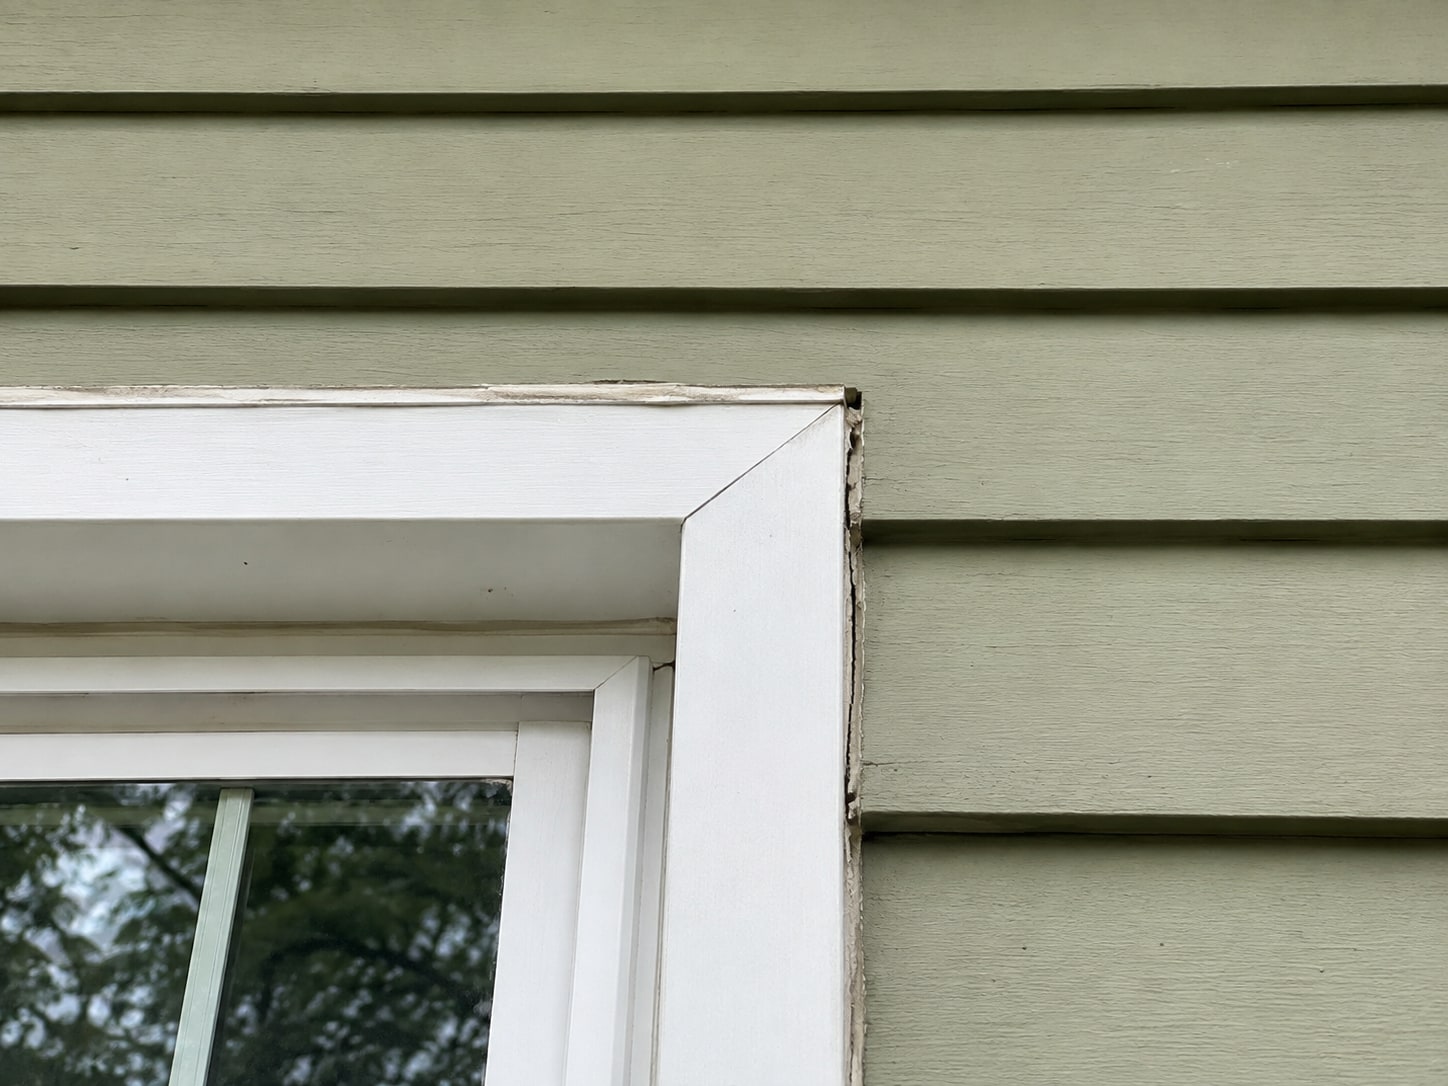
Window trim joint and adjacent cladding.
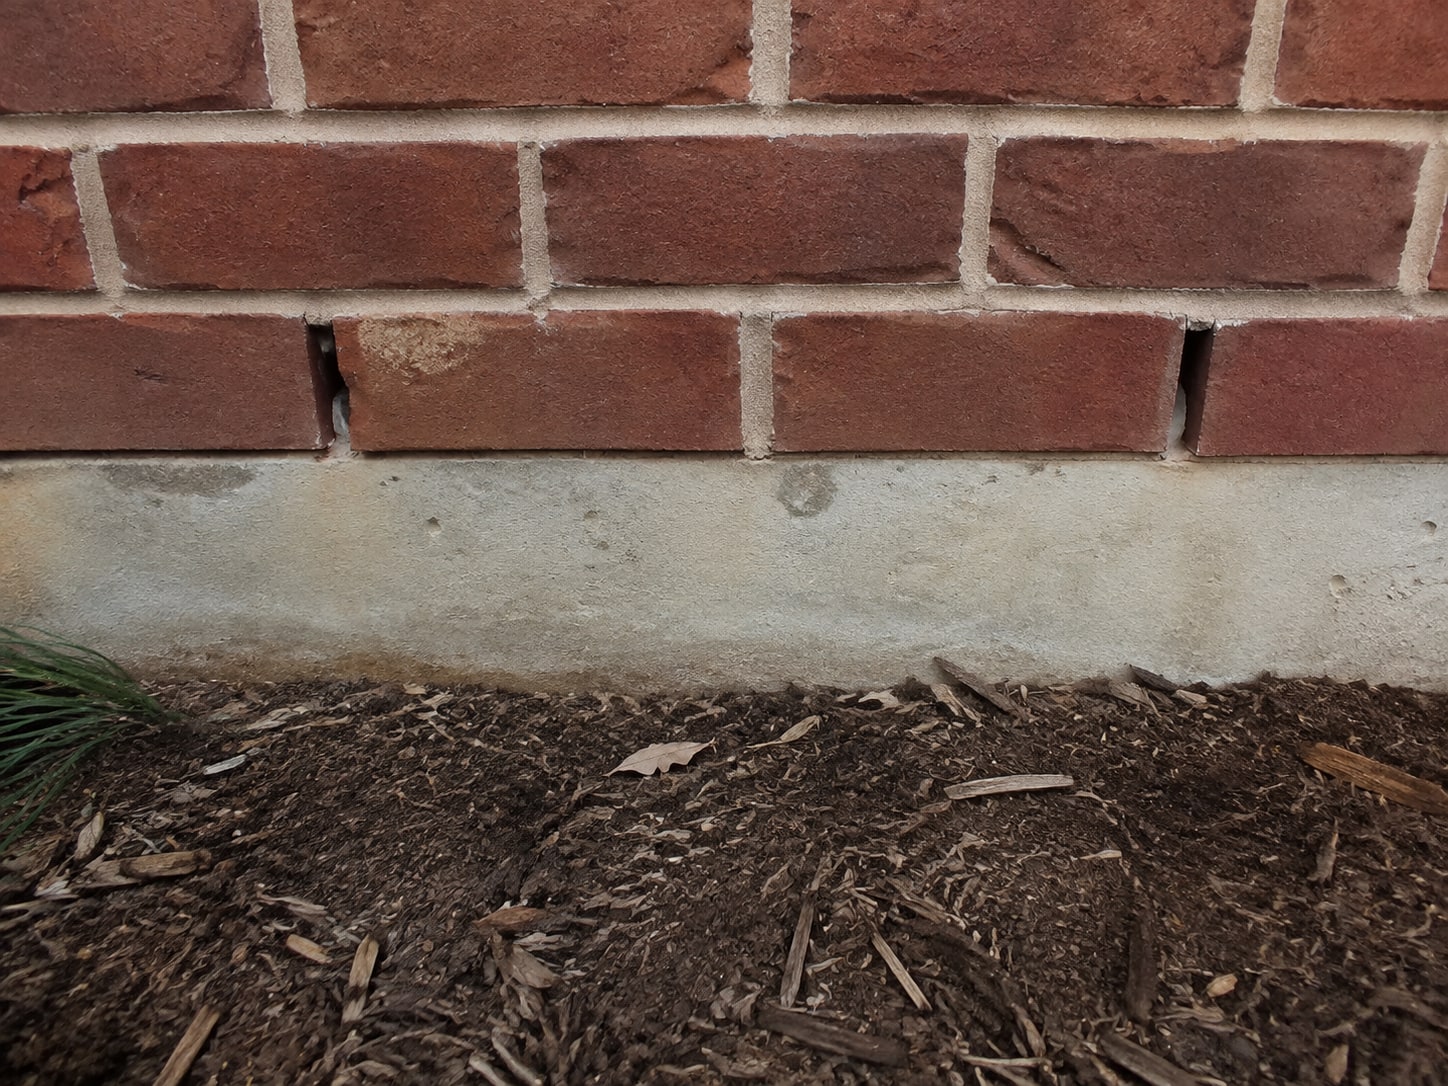
Open drainage joints at the base of the masonry accent.
05Foundation & load paths
4 of 5 items inspected
System record
- Foundation
- Poured concrete
- Lower level
- Partially finished basement
- Floor framing
- Wood framing; limited exposure
- Support posts
- Steel at accessible center beam
- Moisture review
- Visual; selected accessible surfaces
- Concealed areas
- Finished walls and ceilings
Scope and limitations
What this review covers
This visual record describes accessible components. It is not a structural design analysis and does not establish concealed reinforcement, soil bearing, footing depth or compliance with engineering plans.
Care and next steps
Planning for ownership
Record the size and location of any developing crack or movement rather than covering it immediately. A qualified structural professional can determine whether a changing pattern requires investigation beyond a visual inspection.
Foundation & load paths
Utility-room foundation joint
Location: North utility-room wall
A narrow vertical crack is visible at the exposed concrete wall without visible displacement in the demonstration scenario. The surface was dry at the session; seasonal seepage was not tested.
Next step: Document the location and monitor for change or moisture. Obtain further evaluation if movement, widening or recurring dampness appears.
Foundation & load paths
Support post base
Location: Basement center beam
The accessible post is plumb by visual observation and bears at the visible base connection. Finishes conceal the footing dimensions and reinforcement.
Next step: Keep the connection visible where practical and avoid modifying structural supports without appropriate evaluation.
Foundation & load paths
Floor alteration at utility opening
Location: Basement below laundry
An opening for services interrupts a framing member near the utility chase. The size and location warrant evaluation; its effect on capacity cannot be established by appearance alone.
Next step: Have a qualified structural professional or appropriately qualified contractor assess the alteration and specify any needed repair.
Foundation & load paths
Concealed perimeter framing
Location: Finished basement perimeter
Drywall and ceiling finishes conceal rim framing and the majority of the lower wall connection. No invasive removal was performed.
Next step: Resolve any history of moisture or structural alterations through records and appropriate investigation before relying on the concealed assembly.
Foundation & load paths
Accessible slab surface
Location: Storage and mechanical rooms
Visible slab areas show light surface wear without an identified trip-height offset. Floor coverings conceal the slab in finished areas.
Next step: Reassess after removal of floor coverings if renovation is planned.
06Electrical service & isolation points
4 of 5 items inspected
System record
- Nominal service
- 200 A demonstration value
- Main panel location
- Basement utility room
- Secondary panel
- Attached garage
- Supply configuration
- Underground service
- Circuit schedule
- Partly labeled
- Test boundary
- Visual accessible components
Scope and limitations
What this review covers
Electrical observations are limited to safely accessible components and normal user controls. Concealed wiring paths, every connection and loaded-circuit performance were not verified. The inspection is not a substitute for electrical design or a full circuit survey.
Care and next steps
Planning for ownership
Keep panel access clear and have the circuit schedule verified by an electrician. The main disconnect location should be known before an emergency. Do not remove protective covers or attempt live-panel corrections as routine homeowner maintenance.
Electrical service & isolation points
Main enclosure has an open knockout
Location: Basement service panel
The demonstration panel photograph shows an unfilled enclosure opening. The opening compromises the intended barrier around electrical components.
Next step: Have a qualified electrician restore the enclosure with a listed closure appropriate to the panel. Avoid contact with the opening until corrected.
Electrical service & isolation points
Circuit identification incomplete
Location: Main panel schedule
Several circuit descriptions are missing or too broad to identify the served rooms and equipment. Turning off a labeled circuit is not proof that all conductors in a work area are de-energized.
Next step: Have the schedule traced and updated. Use appropriate verification before any electrical work.
Electrical service & isolation points
Garage panel access obstructed
Location: Garage east wall
Stored shelving reduces working access to the panel front. The location should remain available for operation and qualified servicing.
Next step: Relocate storage and have required access clearances checked for the installed equipment.
Electrical service & isolation points
Grounding path partly concealed
Location: Service grounding connection
The visible conductor enters a concealed route. The full path, buried electrode and concealed terminations could not be verified.
Next step: Have a qualified electrician investigate if records or visible defects raise concerns about grounding continuity.
Electrical service & isolation points
Disconnect identification
Location: Main service enclosure
A main disconnect is identifiable at the service equipment. This record identifies the location; it does not describe an emergency isolation procedure for every possible supply source.
Next step: Confirm the presence of any separate generation or battery system and obtain its shutdown instructions if applicable.
07Branch circuits & occupant protection
4 of 5 items inspected
System record
- Accessible wiring
- Copper visible in selected areas
- Receptacle review
- Representative accessible outlets
- Protection devices
- GFCI devices at wet locations
- Smoke alarms
- Observed on both occupied levels
- Carbon monoxide alarms
- Observed near sleeping area
- Unavailable locations
- Outlets behind fixed furnishings
Scope and limitations
What this review covers
Representative accessible devices were checked. Furniture and stored belongings restricted some outlets. Alarm presence and a test-button response do not establish sensor age, coverage or long-term reliability.
Care and next steps
Planning for ownership
Maintain alarm systems and protective devices using their manufacturer's instructions. Have an electrician investigate a device that does not respond normally; repeated resetting without diagnosis can conceal an unresolved condition.
Branch circuits & occupant protection
Exterior receptacle cover damaged
Location: Rear patio outlet
The weather cover is cracked and does not close fully around the receptacle. Exposure can allow moisture to reach the device and box.
Next step: Have a qualified electrician provide a suitable cover and inspect the device and enclosure for moisture effects.
Branch circuits & occupant protection
Hall receptacle loose
Location: Upper hall near linen closet
The receptacle moves within the wall opening when a plug is inserted. The concealed box and fastening arrangement were not dismantled.
Next step: Have the device secured and the box condition checked by a qualified electrician.
Branch circuits & occupant protection
Bathroom protection responds
Location: Main and upper bathroom outlets
Accessible GFCI devices tripped and reset using their controls in the demonstration. This response does not establish the protection of outlets that were not accessible.
Next step: Record and test the devices according to manufacturer guidance; investigate inconsistent operation.
Branch circuits & occupant protection
Alarm age not documented
Location: Upper sleeping corridor
The alarm responded to its test button, but the installation date was not available. A successful test button response alone is not a service-life assessment.
Next step: Check labeling and installation records and replace units when required by their manufacturer.
Branch circuits & occupant protection
Furnished wall outlets
Location: Office and living room
Heavy furniture blocks selected receptacles. No furniture was moved, and the report does not extrapolate test results to inaccessible outlets.
Next step: Include these devices in a review when access is available, particularly before using them for high-demand equipment.
08Climate system A — main floor
4 of 5 items inspected
System record
- Equipment tag
- System A
- Heat source
- Gas furnace
- Cooling
- Split-system air conditioner
- Thermostat zone
- Main floor and basement
- Filter location
- Return cabinet beside furnace
- Service record
- Previous spring invoice supplied
Scope and limitations
What this review covers
System A was considered independently from the upper-floor equipment. Normal thermostat response and visible condition were reviewed. Heat-exchanger internals, refrigerant charge and concealed ducts were not comprehensively tested.
Care and next steps
Planning for ownership
Keep the service record with the equipment tag so work on one system is not mistaken for maintenance of both. A qualified HVAC technician should set an appropriate service and filter schedule for the installed equipment and conditions.
Climate system A — main floor
Condensate line connection loose
Location: System A cabinet drain
A drain connection at the cabinet can move at the joint and has surface staining below it. Continued leakage could wet the platform and nearby finishes.
Next step: Have an HVAC technician correct the drain connection and verify drainage during operation. Check affected materials after the leak source is addressed.
Climate system A — main floor
Return filter loaded
Location: System A return cabinet
The filter has visible debris loading. No airflow measurement was performed, so a specific efficiency loss is not assigned.
Next step: Install the specified replacement filter and have airflow concerns assessed during service.
Climate system A — main floor
Thermostat response
Location: Main-floor hall
The equipment responded to a normal cooling demand. This is a point-in-time response and not a test under peak seasonal conditions.
Next step: Reassess any unusual noise, cycling or comfort imbalance during occupancy.
Climate system A — main floor
Outdoor coil clearance
Location: West condenser pad
The outdoor unit is accessible from the open side of the service pad. Vegetation does not obstruct the visible coil faces. Clearance to the building was not measured against an installation specification.
Next step: Keep the service approach clear and have equipment-specific clearances checked during routine service.
Climate system A — main floor
Heat-exchanger surfaces concealed
Location: Furnace interior
The full heat exchanger cannot be viewed without service-level disassembly. Visible cabinet condition does not establish integrity of every internal surface.
Next step: Use qualified service evaluation where maintenance history, combustion performance or other indicators warrant it.
Climate system A — main floor
Photo record
1 / 1 · 4 photos
System A cabinet drain connection and surrounding surface.
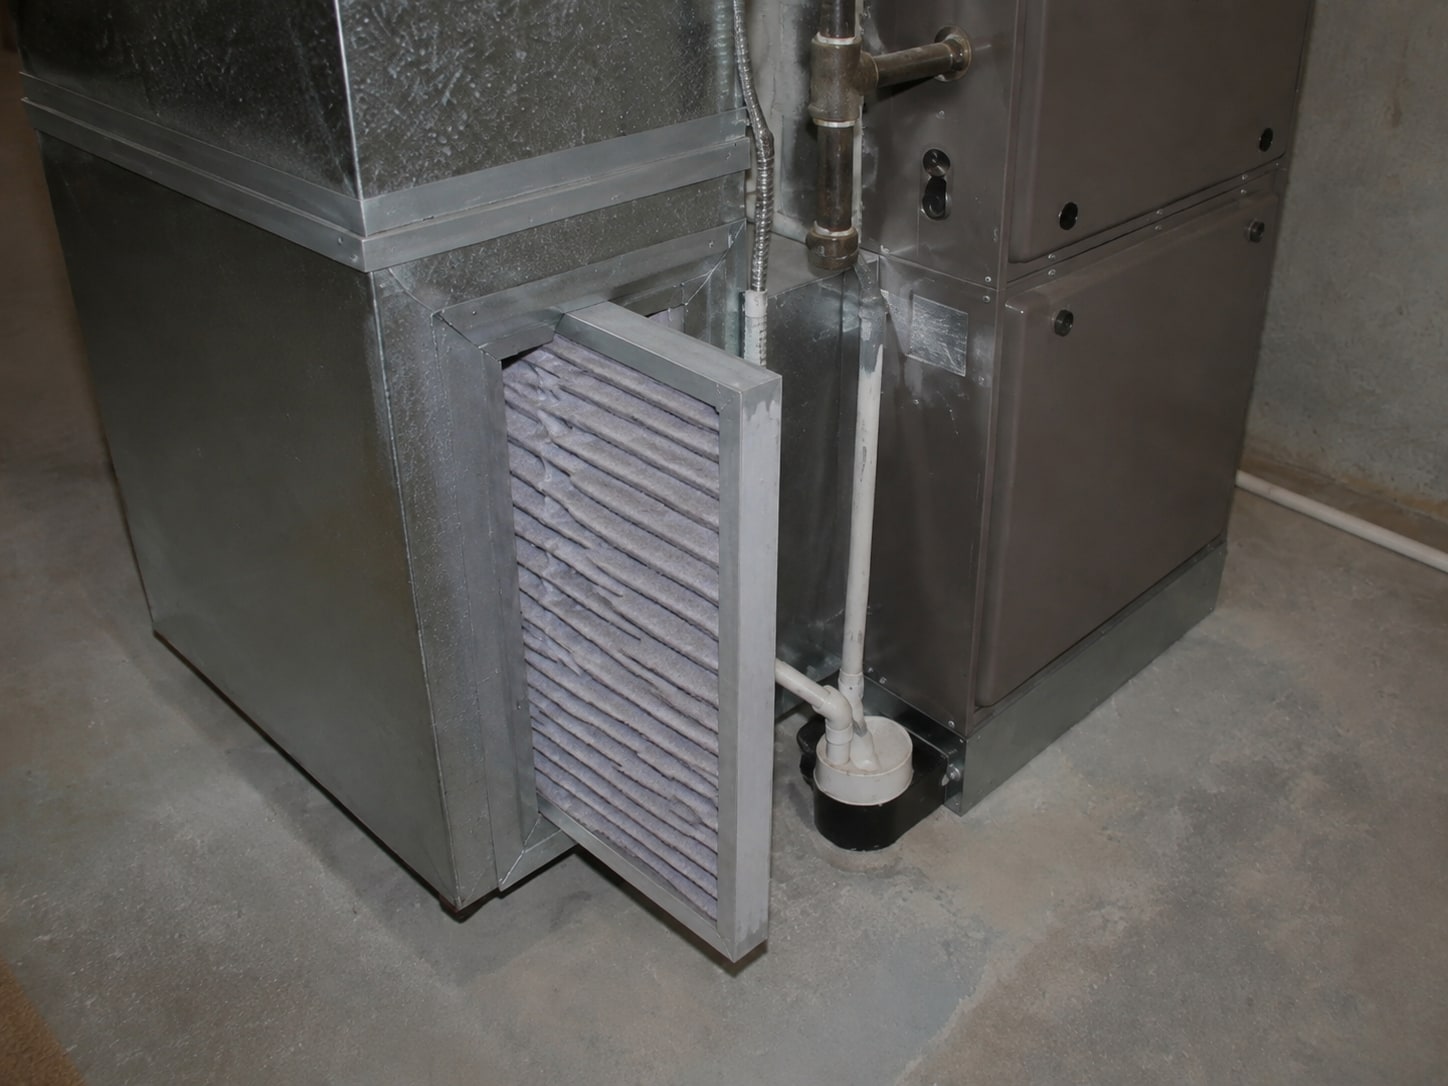
Debris loading on the System A return filter.
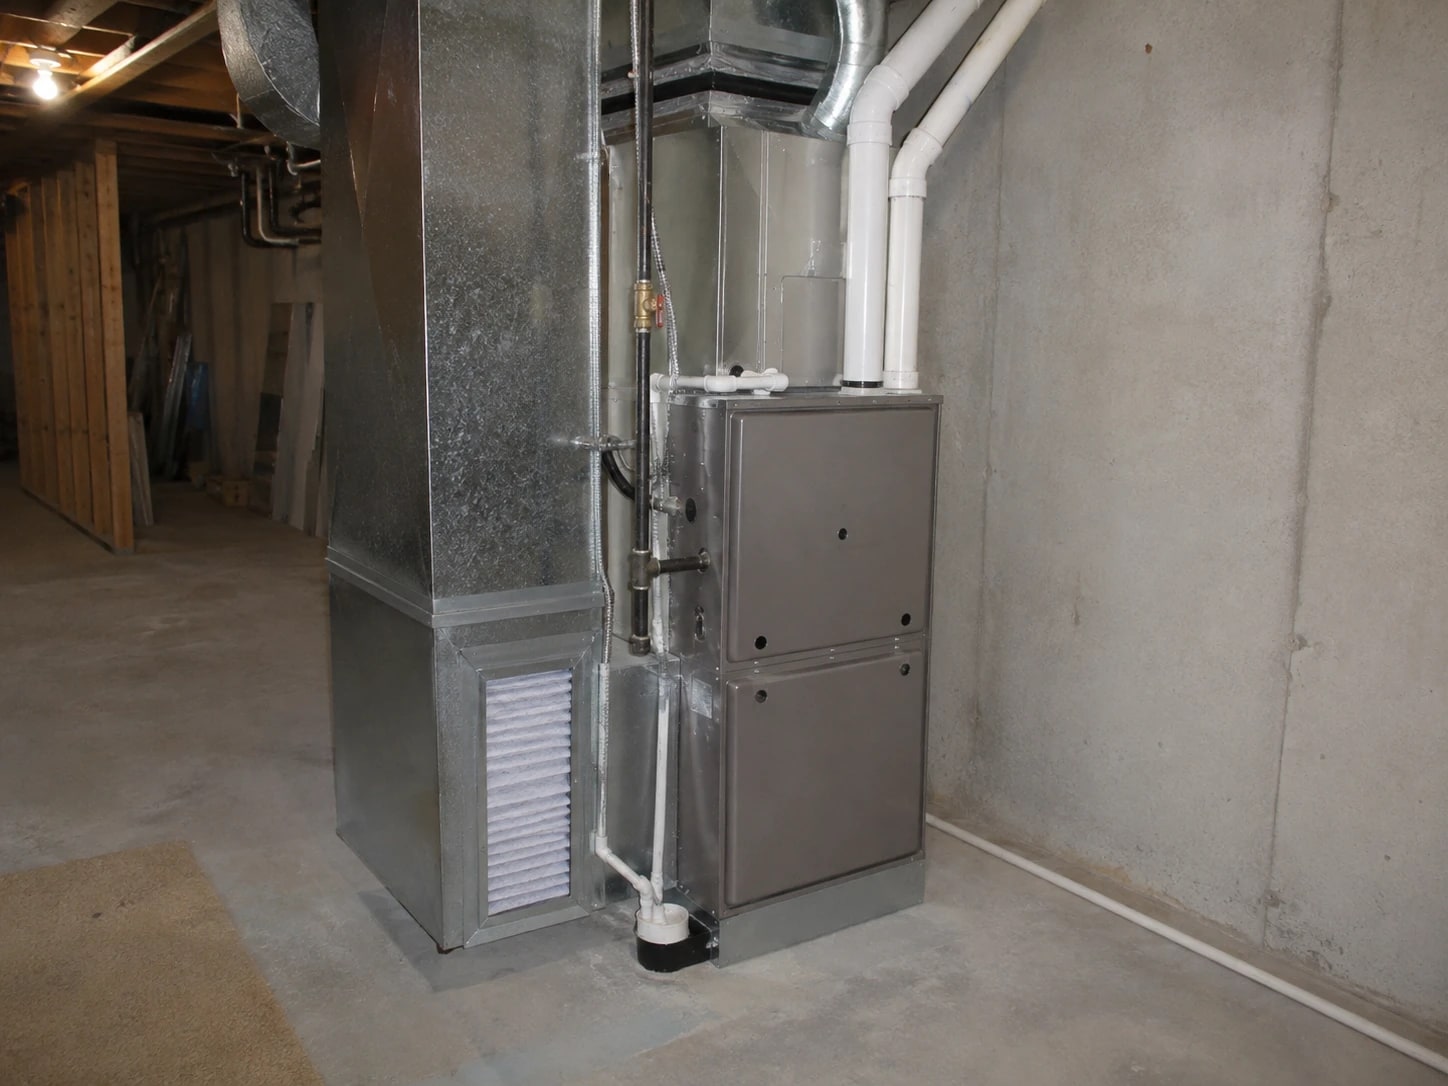
Main-floor system: furnace and accessible service area.
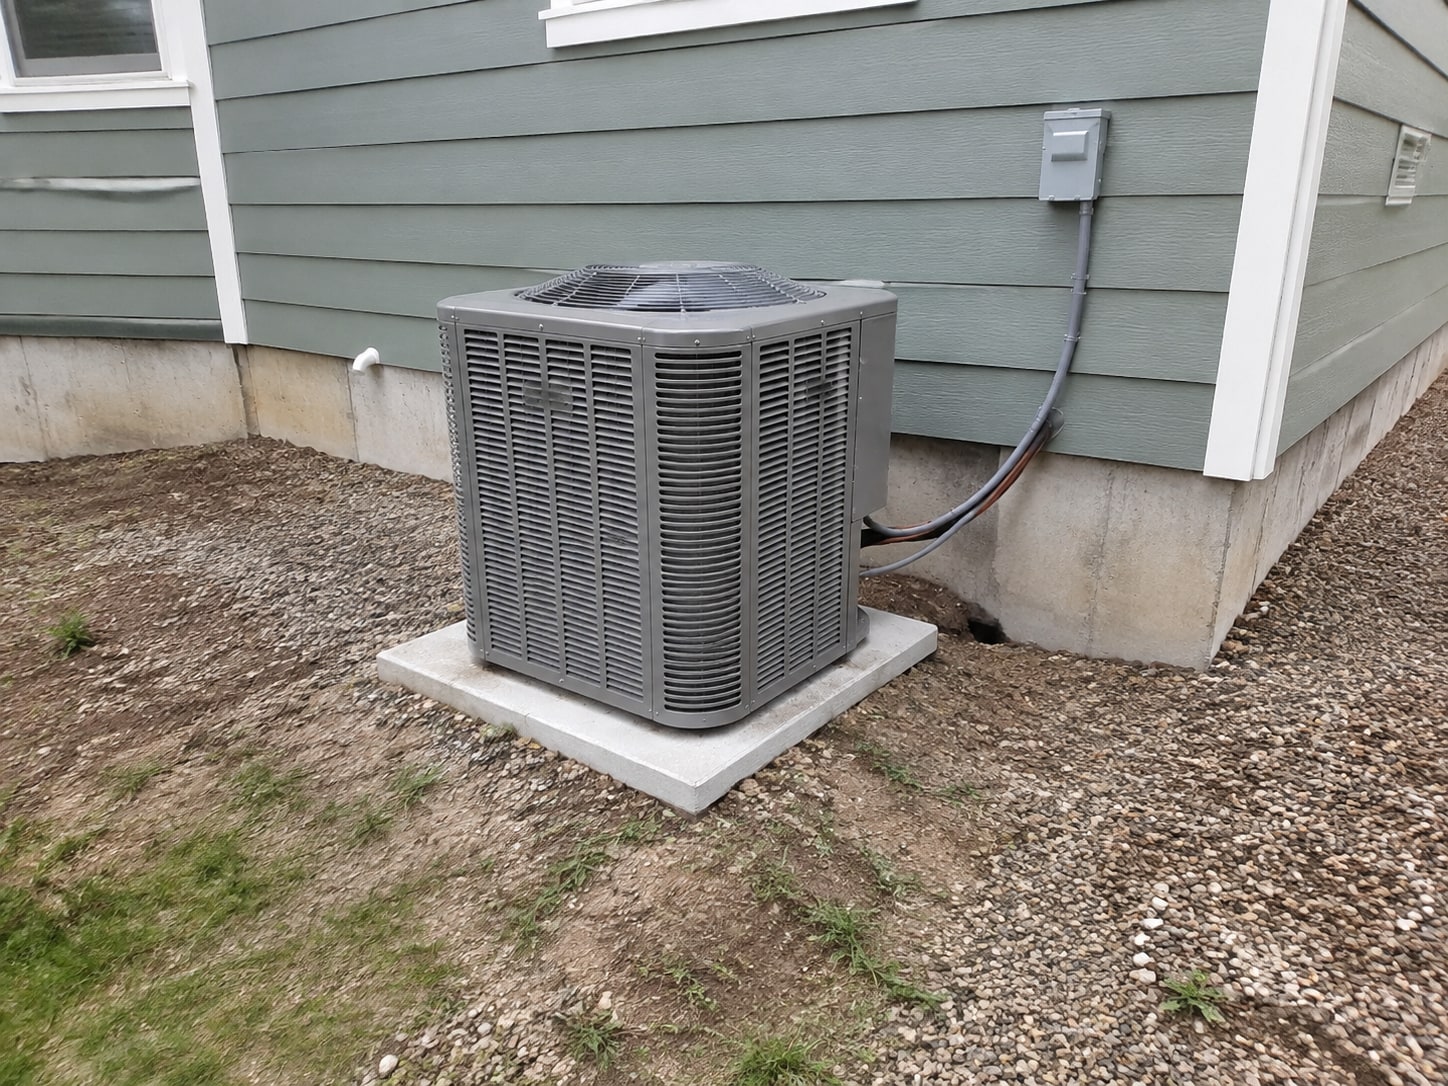
System A outdoor unit, service pad and adjacent enclosure.
09Climate system B — upper floor
4 of 5 items inspected
System record
- Equipment tag
- System B
- Heat source
- Electric heat pump
- Air handler
- Attic service platform
- Thermostat zone
- Upper floor
- Drain arrangement
- Primary drain and auxiliary pan
- Service record
- Not supplied
Scope and limitations
What this review covers
The attic equipment was accessed along the service walkway. Remote duct joints beyond the walkway and concealed refrigerant connections were not accessible. Observations apply to System B rather than the main-floor furnace.
Care and next steps
Planning for ownership
Keep the attic access route and equipment platform clear. Have service visits identify both the primary drain and overflow protection arrangement, and retain the technician's findings by equipment tag.
Climate system B — upper floor
Auxiliary pan contains staining
Location: Below upper-floor air handler
Staining in the pan indicates prior water accumulation in this demonstration scenario. The source and date cannot be established from the stain alone.
Next step: Have an HVAC technician assess primary drainage and overflow protection, clean the pan and verify operation after correction.
Climate system B — upper floor
Suction line insulation separated
Location: Attic equipment connection
A short section of refrigerant-line insulation is open at a joint near the cabinet. Condensation may form on a cold exposed surface under suitable conditions.
Next step: Have the insulation restored using a material appropriate to the installation.
Climate system B — upper floor
Upper thermostat response
Location: Upper landing
The heat pump responded to the selected operating mode. No seasonal-capacity or backup-heat performance claim is made from this single session.
Next step: Ask the service provider to explain the equipment's normal mode changes and auxiliary heat operation.
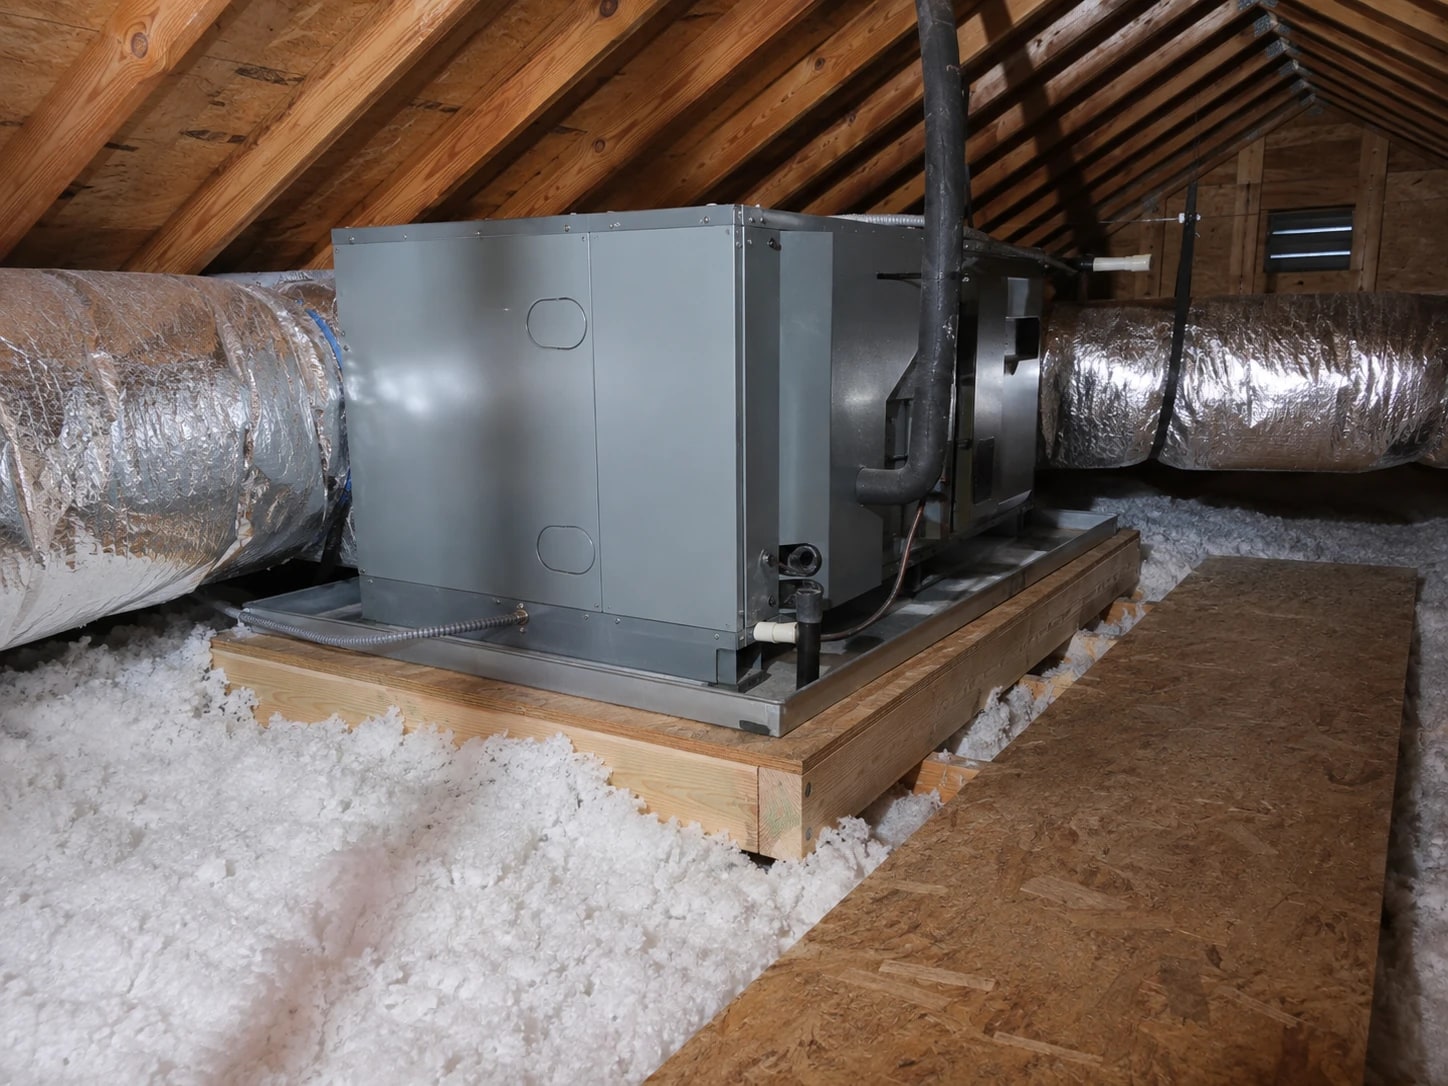
Climate system B — upper floor
Far bedroom branch concealed
Location: North bedroom supply route
The branch duct crosses an attic area beyond safe walkway access. Its full support, insulation and connections were not examined.
Next step: Investigate through qualified access if persistent comfort or condensation symptoms occur.
Climate system B — upper floor
Service labeling absent
Location: Air handler service area
The installation and recent service dates are not recorded on accessible labeling. The cabinet identity alone does not establish the age of all system components.
Next step: Obtain equipment-specific installation information and establish a documented maintenance baseline.
10Water supply & hot-water plant
4 of 5 items inspected
System record
- Supply source
- Municipal; demonstration assumption
- Visible distribution
- Copper with PEX repairs
- Main shutoff
- Basement west wall
- Water heating
- Storage tank; 50 gallons
- Fuel
- Natural gas
- Water treatment
- Cartridge filter near entry
Scope and limitations
What this review covers
Visible piping and representative fixture response were reviewed. Water quality, buried supply condition and pressure performance under every combination of use were not tested. Concealed leakage remains outside a visual examination.
Care and next steps
Planning for ownership
Know the main shutoff location and have uncertain valves checked before an emergency. Retain service information for the water heater and treatment components; a filter cartridge requires maintenance independent of the visible piping condition.
Water supply & hot-water plant
Water-heater base corrosion
Location: Basement water heater
Surface corrosion is represented at the lower jacket edge, with no active leakage recorded. The installation date is not documented.
Next step: Have the unit assessed during service, confirm its age and plan replacement based on condition and qualified advice.
Water supply & hot-water plant
Supply support at repair transition
Location: Basement ceiling near laundry
A repaired piping transition is insufficiently supported and moves when a nearby fixture operates. The concealed continuation was not visible.
Next step: Have a qualified plumber secure the assembly and inspect the transition for stress or leakage.
Water supply & hot-water plant
Main shutoff location recorded
Location: Basement west utility wall
The main shutoff is accessible and labeled in the demonstration inventory. It was not force-operated where doing so might disturb an aged valve.
Next step: Ask a plumber to confirm reliable operation during scheduled maintenance.
Water supply & hot-water plant
Filter service date unknown
Location: Water-entry cartridge housing
No replacement date is recorded on the cartridge housing. The cartridge's condition and treatment performance were not evaluated.
Next step: Obtain the appropriate cartridge specification and maintenance instructions; do not infer water quality from the presence of a filter.
Water supply & hot-water plant
Relief discharge route partly concealed
Location: Water-heater relief piping
The visible discharge piping continues behind stored materials, preventing verification of the termination. No discharge test was performed.
Next step: Make the full route accessible for a qualified plumber to evaluate.
11Fixture groups & drainage
4 of 5 items inspected
System record
- Bathroom groups
- Three
- Waste system
- Municipal sewer; not camera-scoped
- Visible waste piping
- PVC and ABS
- Fixture methods
- Normal controls; accessible cabinets
- Kitchen drain
- Trap accessible in sink base
- Concealed areas
- Tub surrounds and finished walls
Scope and limitations
What this review covers
Accessible fixtures were operated using normal controls and visible drain connections were reviewed. Brief fixture use does not reproduce prolonged household use. Buried drains and concealed joints were not evaluated by camera.
Care and next steps
Planning for ownership
Respond to recurring staining or odor by locating the cause before renewing finishes. Keep drain access available after storage or cabinet alterations so future leaks can be identified early.
Fixture groups & drainage
Kitchen trap leakage evidence
Location: Kitchen sink base cabinet
The existing InspectorKit demonstration photograph shows staining and corrosion at the drain trap. The cabinet base has marks consistent with prior moisture exposure.
Next step: Have a qualified plumber correct the connection and verify it under fixture use. Check that affected cabinet materials are dry before refinishing.
Fixture groups & drainage
Upper bath shower seal separation
Location: Upper shared bathroom
A localized sealant separation is visible at the shower enclosure return. Concealed waterproofing was not exposed and cannot be assessed through the finish joint.
Next step: Have the joint maintained and investigate any related moisture symptoms before assuming sealant alone resolves them.
Fixture groups & drainage
Main-floor toilet movement
Location: Guest bathroom
The toilet rocks slightly at its base in the demonstration scenario. The flange and seal beneath the fixture are concealed.
Next step: Have a plumber correct the attachment and evaluate the seal and supporting materials.
Fixture groups & drainage
Primary bathroom fixture operation
Location: Primary ensuite
Accessible basin and shower controls responded, and no leakage was represented at the visible basin joints during operation.
Next step: Monitor concealed plumbing areas after possession; this observation covers only the accessible session.
Fixture groups & drainage
Drain line below slab
Location: Building drain
The drain route beneath the slab was not accessible, and no sewer camera examination was included.
Next step: Consider a separate drain evaluation when history, age or recurring symptoms create a concern.
12Rooms, stairs & interior openings
4 of 5 items inspected
System record
- Living levels
- Two plus partial basement
- Stairways
- Main stair and basement stair
- Floor finishes
- Wood, tile and carpet
- Wall finishes
- Painted gypsum board
- Glazing
- Insulated units in most rooms
- Access limitations
- Furnished perimeter walls
Scope and limitations
What this review covers
Accessible finishes and a representative selection of openings were reviewed. Furnishings, floor coverings and wall finishes can conceal conditions. This record distinguishes a cosmetic surface observation from an unresolved moisture or support concern.
Care and next steps
Planning for ownership
Record the location and date of new staining, cracking or movement. Correlating a symptom with weather or equipment use can help the appropriate specialist locate its source.
Rooms, stairs & interior openings
Basement handrail loose
Location: Lower stair flight
The handrail moves at its lower attachment under light use. A handrail that moves unexpectedly can reduce support during a descent.
Next step: Have a qualified contractor restore a secure attachment before relying on it for support.
Rooms, stairs & interior openings
Dining ceiling stain
Location: Dining room below upper bath
An older stain is represented near the ceiling edge. No active moisture was recorded, but the stain's source and repair history are unknown.
Next step: Obtain repair history and investigate recurrence. A dry observation does not establish that the original cause was corrected.
Rooms, stairs & interior openings
Office door binds
Location: Main-floor office
The latch-side edge rubs the frame during closing. No cause is assigned without further assessment of hinges, clearances and surrounding movement.
Next step: Have the door adjusted and investigate if binding progresses or accompanies other movement.
Rooms, stairs & interior openings
Accessible window operation
Location: Living room and bedrooms
Selected accessible windows opened, closed and latched. Locked or obstructed units are excluded from this observation.
Next step: Maintain hardware and keep intended access openings usable.
Rooms, stairs & interior openings
Floor below fitted carpet
Location: Upper bedrooms
Carpet conceals the finish substrate and portions of the floor surface. The inspection did not lift bonded or fitted floor coverings.
Next step: Reassess exposed materials during renovation or if soft spots, odors or moisture symptoms develop.
13Kitchen & laundry equipment
4 of 5 items inspected
System record
- Cooking fuel
- Electric
- Ventilation
- Range hood; exterior termination not fully visible
- Dishwasher
- Built-in
- Laundry location
- Main-floor utility room
- Dryer fuel
- Electric
- Test extent
- Basic accessible controls
Scope and limitations
What this review covers
Basic controls and visible installation conditions were reviewed. Specialized modes, every appliance cycle and manufacturer performance specifications were not exhaustively tested. Appliances can fail after an inspection despite responding during a short check.
Care and next steps
Planning for ownership
Keep appliance installation and service information with the house records. Separate an appliance operating issue from a connection, support or ventilation problem so the appropriate service provider addresses the cause.
Kitchen & laundry equipment
Dishwasher attachment movement
Location: Kitchen dishwasher
The appliance shifts forward when the rack is extended. Its upper attachment does not visibly restrain the movement.
Next step: Have a qualified installer secure the appliance and check connected services for strain.
Kitchen & laundry equipment
Dryer connector compressed
Location: Behind laundry appliance
The accessible connector is compressed where the dryer sits close to the wall. The full concealed exhaust route was not inspected.
Next step: Have a qualified installer establish an appropriate connector route and verify the discharge path.
Kitchen & laundry equipment
Range response
Location: Kitchen cooking area
Selected surface elements and the oven responded to normal controls. Temperature calibration and all cooking modes were not measured.
Next step: Use manufacturer instructions for operation and qualified service for persistent performance concerns.
Kitchen & laundry equipment
Laundry shutoff access
Location: Utility-room appliance box
The visible shutoffs remain accessible above the appliance connection point. They were not forced through a stiff operating range.
Next step: Have uncertain valves serviced before disconnecting or replacing appliances.
Kitchen & laundry equipment
Hood termination concealed
Location: Upper wall above cooking area
The accessible hood operated, but the full duct route and exterior termination could not be traced through finishes.
Next step: Confirm the route with a qualified installer if ventilation performance is poor or renovation is planned.
Kitchen & laundry equipment
Photo record
1 / 1 · 4 photos
Upper dishwasher attachment below the countertop.
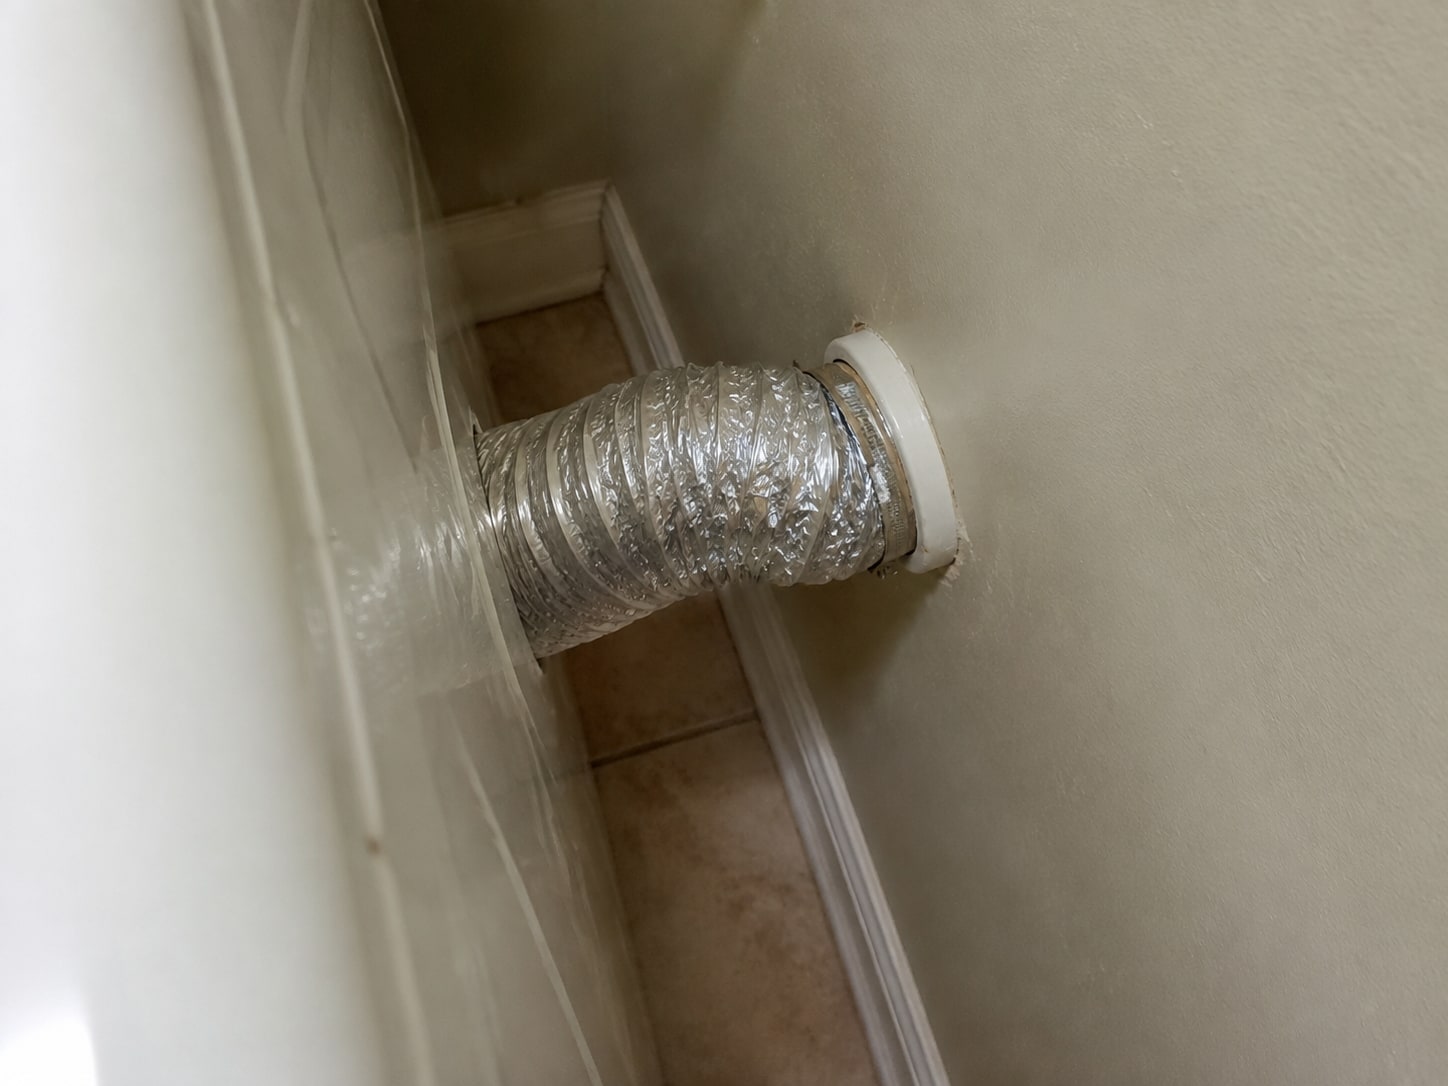
Compressed transition duct behind the dryer.
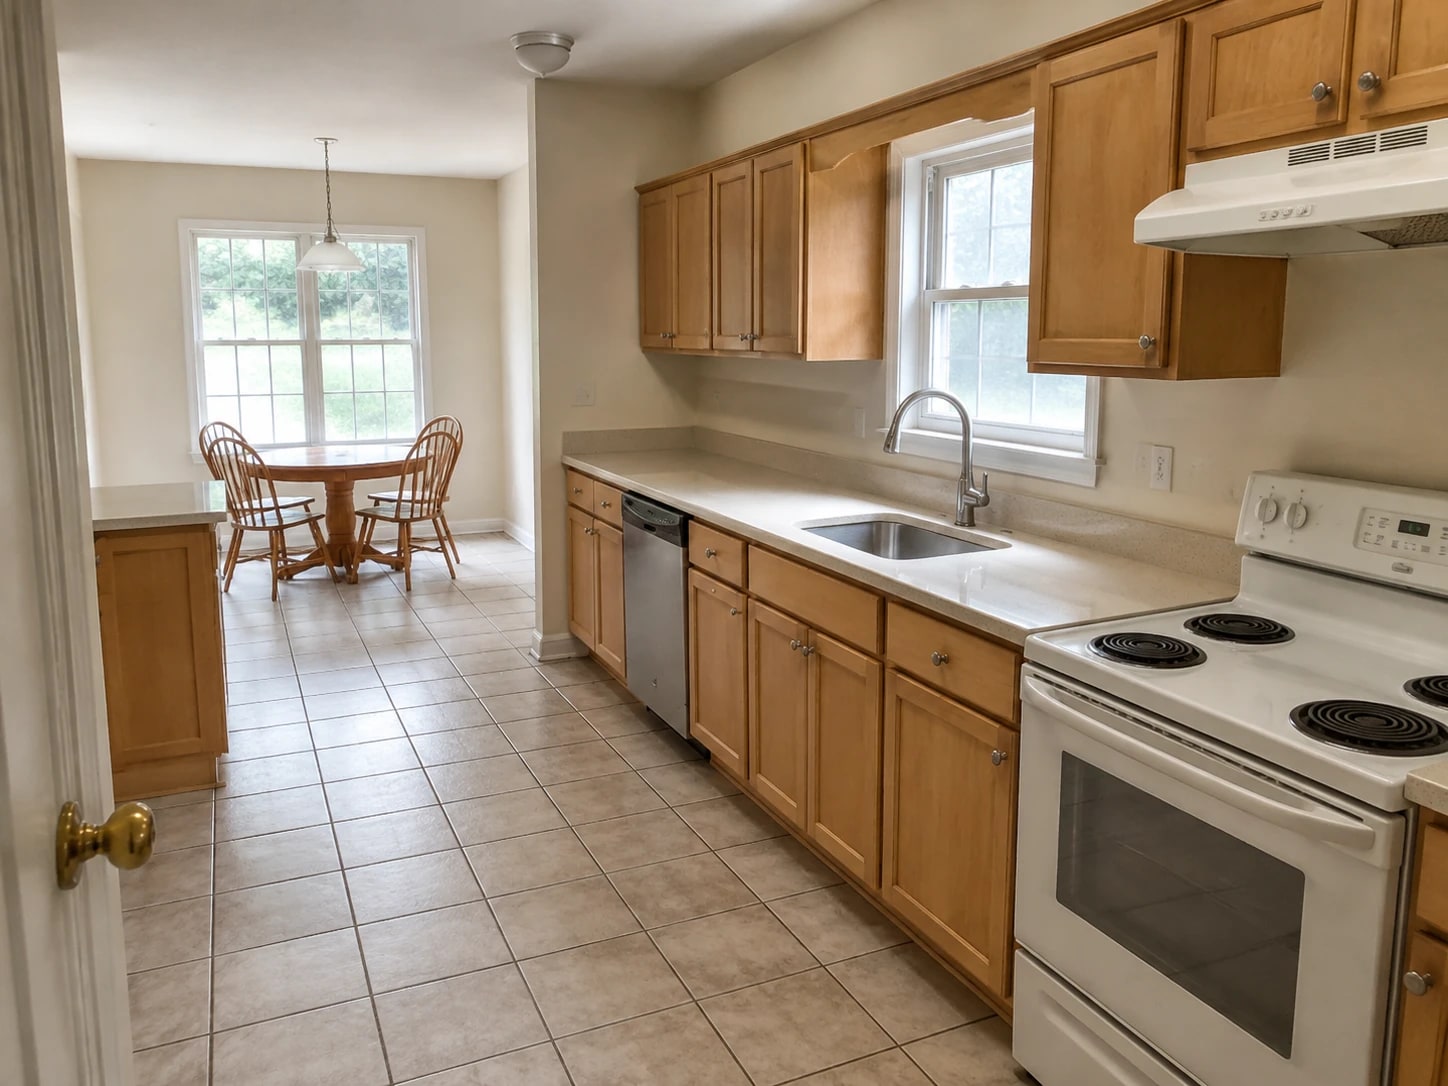
Kitchen overview and installed appliances.
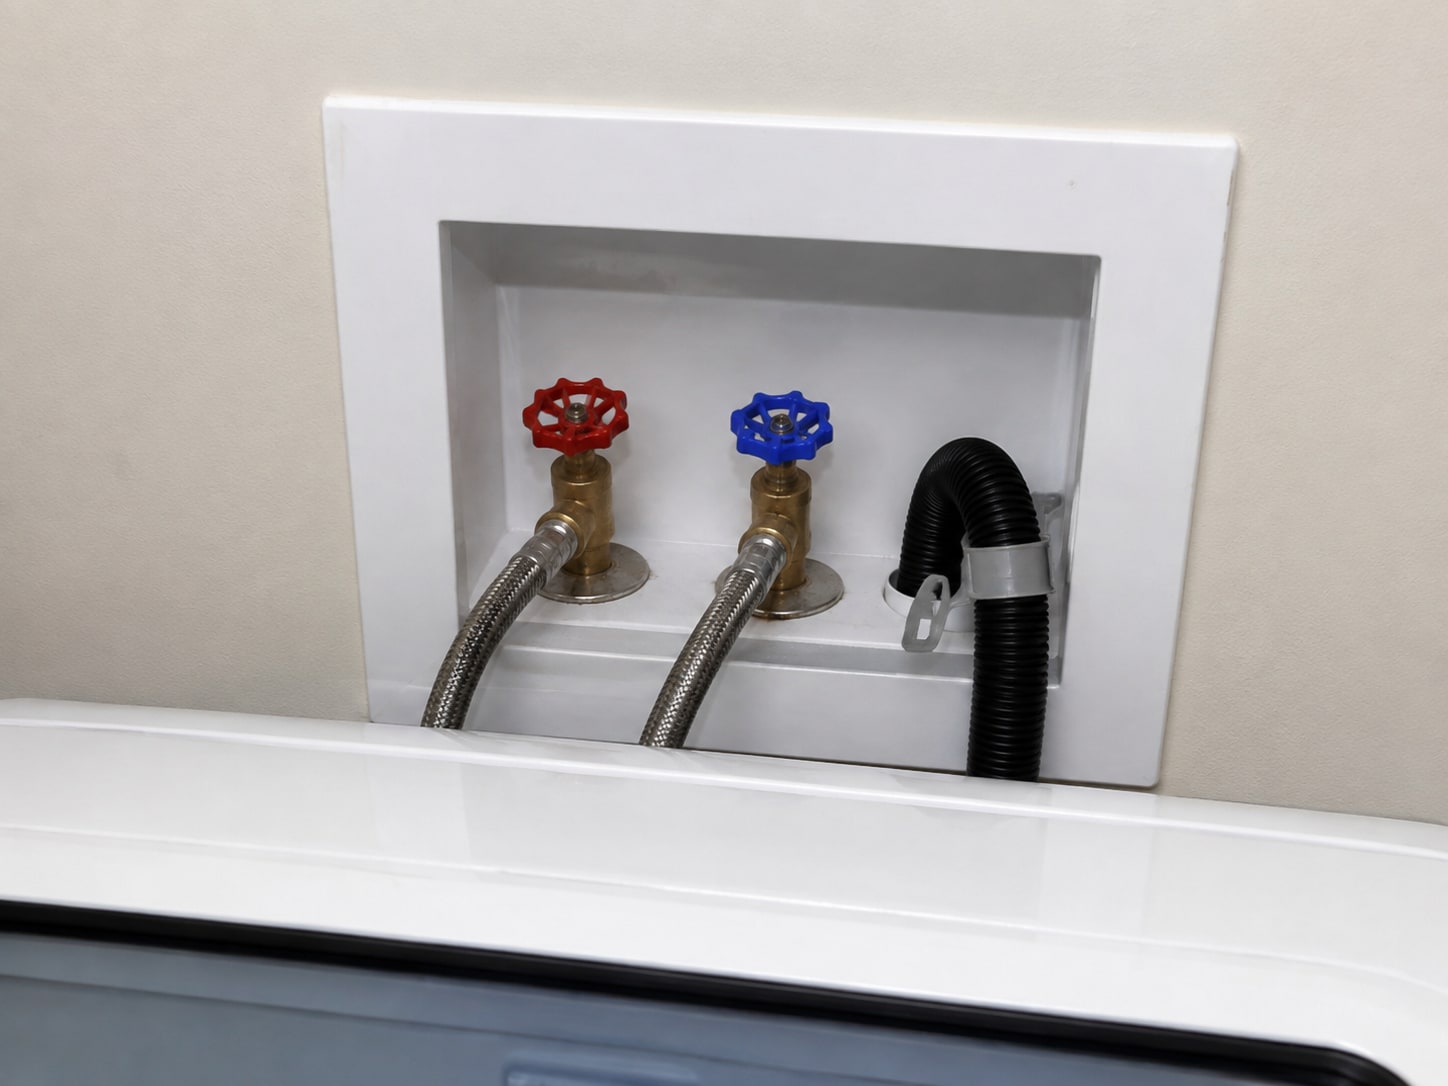
Accessible washer shutoffs and appliance connections.
14Roof-space access & thermal boundary
4 of 5 items inspected
System record
- Access point
- Upper hall hatch
- Walkable area
- Service walkway only
- Insulation
- Loose fill with localized displacement
- Ventilation
- Visible soffit and ridge paths
- Equipment in space
- System B air handler
- Excluded areas
- Beyond safe service walkway
Scope and limitations
What this review covers
The attic review remained on the accessible walkway. Insulation and low clearance concealed framing connections, ceiling penetrations and remote eaves. No thermal-performance calculation or concealed air-leakage test was performed.
Care and next steps
Planning for ownership
Coordinate insulation work with equipment access, ventilation and moisture control. An increase in insulation depth alone does not resolve blocked ventilation or a leaking drain near attic equipment.
Roof-space access & thermal boundary
Insulation displaced at service route
Location: Around attic air handler platform
Insulation is thinner along the edges of the service route where it has been disturbed. No whole-house insulation rating is inferred from these local observations.
Next step: Have displaced insulation restored while retaining safe access and required equipment clearances.
Roof-space access & thermal boundary
Bathroom duct ends short of outlet
Location: Accessible attic above shared bathroom
The visible exhaust duct connection separates before the intended outlet. Moist air could enter the roof space during fan operation.
Next step: Have a qualified contractor reconnect and support the exhaust route and examine adjacent materials for moisture effects.
Roof-space access & thermal boundary
Hatch perimeter seal
Location: Upper hall access hatch
The hatch has incomplete perimeter weatherstripping in the demonstration scenario. This leaves a local path between conditioned space and the attic.
Next step: Have the hatch sealing and insulation improved without preventing secure access.
Roof-space access & thermal boundary
Visible ventilation openings
Location: Accessible eave and ridge view
Visible paths at the inspected area are not blocked by stored material. Remote eaves were not examined and are not included in this observation.
Next step: Preserve ventilation paths during insulation and roofing work.
Roof-space access & thermal boundary
Remote roof framing
Location: North attic beyond walkway
Low clearance and concealed footing locations prevented safe access to the remote roof framing.
Next step: Arrange appropriate access if signs of leakage or movement require a closer review.
15Garage, storage & outbuildings
4 of 5 items inspected
System record
- Garage
- Attached two-car
- House connection
- Utility-room door
- Vehicle doors
- One double-width overhead door
- Separate structure
- Unconditioned storage shed
- Visible floor
- Concrete slab
- Excluded material
- Stored personal property
Scope and limitations
What this review covers
The attached garage and a limited exterior view of the storage shed are recorded separately from occupied rooms. Stored material restricted some wall surfaces. Contents, tools and portable equipment are outside this demonstration inspection scope.
Care and next steps
Planning for ownership
Keep access to panels, doors and operating controls clear. A garage used for storage still needs functional access and protection appropriate to its connection with the residence.
Garage, storage & outbuildings
House door does not close reliably
Location: Garage-to-utility-room opening
The door stops short of latching when released from a partly open position. The condition affects the intended separation at the house connection.
Next step: Have a qualified contractor evaluate the door assembly and restore reliable closure and latching.
Garage, storage & outbuildings
Vehicle door safety response
Location: Main overhead door
The photo-sensor response was represented as functional during a normal control check. Spring balance and service-level adjustments were not attempted.
Next step: Maintain the system using manufacturer instructions and use a qualified door technician for adjustments.
Garage, storage & outbuildings
Slab surface wear
Location: Garage vehicle parking bays
Localized surface scaling is visible. No conclusion about concealed slab reinforcement or soil support follows from this surface condition.
Next step: Monitor deterioration and obtain repair advice if the surface continues to break down or creates a walking hazard.
Garage, storage & outbuildings
Stored wall surfaces
Location: Rear garage corners
Tall storage units conceal two wall areas and the wall-to-floor junction below them.
Next step: Inspect these areas when accessible and investigate any concealed staining before painting or enclosing them.
Garage, storage & outbuildings
Storage shed threshold decay
Location: Detached shed entrance
The exposed lower threshold is soft at one end. The shed is not represented as habitable space, and its concealed floor supports were not inspected.
Next step: Have a qualified contractor determine the extent of deterioration and restore safe entrance support.
16Handover & follow-up record
2 of 3 items inspected
System record
- Urgent follow-up
- Electrical enclosure and stair support
- Water-related follow-up
- Roof transition; ground drainage; fixture and equipment drains
- Records requested
- Installation and service history
- Completion evidence
- Invoices and identified repair photographs
- Verification method
- Qualified work plus location-specific recheck
- Demonstration status
- Original fictional sample
Scope and limitations
What this review covers
This closing record organizes the sample's follow-up priorities. It is not a quotation, work specification or certification that repairs have occurred. The original condition observations remain in the system records even after a separate repair is documented.
Care and next steps
Planning for ownership
Ask each provider to identify the exact location and work performed. Keep a repair record that can be connected to the original finding. Where correction changes or conceals an assembly, obtain suitable documentation before the work is covered.
Handover & follow-up record
Safety items require priority attention
Location: Electrical panel and basement stair
Two specific safety observations are identified in their system records. A summary supports triage but does not replace the complete finding or specialist assessment.
Next step: Arrange appropriate qualified evaluation and correction before normal reliance on the affected components.
Handover & follow-up record
Water pathways need connected review
Location: Roof, exterior grade and drains
The sample includes independent water-related observations at different systems. Each requires a location-specific response; completing one repair does not establish that another pathway is resolved.
Next step: Document each correction separately and check relevant surfaces after suitable use or weather conditions.
Handover & follow-up record
Restricted areas remain unresolved
Location: Locations listed in system records
The absence of a reported defect in an inaccessible area is not a positive condition assessment. Those locations remain outside the demonstrated visual coverage.
Next step: Arrange access and appropriate follow-up where the transaction or planned work depends on those concealed conditions.